Brownie Stuffed Swirled Marshmallow Pops

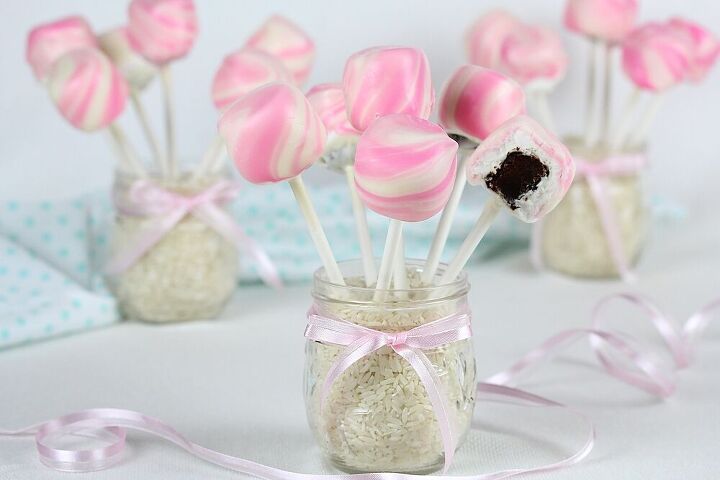
These tasty treats consist of brownie stuffed marshmallows that are swirled in white and pink candy melt. The swirled effect looks impressive but is very easy to do.
Start by hollowing out the center of the marshmallow, then stuff it with a chunk of brownie. Next, insert a cookie stick into the brownie.
To create the swirl design, pipe an asterisk design with pink candy melt into a bowl of melted white candy melt. Dip a marshmallow pop about halfway into the candy melt, then start twisting as you submerge the rest of it completely. As you pull the marshmallow stick back out, twist in the opposite direction to create the swirls. That’s it! It’s so fun!!
These pink and white marshmallow pops would be a perfect treat for Valentines Day, but they can be used for so much more! They are customizable and perfect for any occasion...just change the color scheme to suit the event.
They would be a big hit with anything kid-related: birthday parties, sleepovers, bake sales. How about special occasions such as gender reveal, weddings, showers? What bride-to-be or mother-to-be wouldn’t like to have these sweet treats at their party? Let’s not forget game day and the holidays—customize the color to cheer your favorite team on or to suit the holiday theme.
Try these and have fun!
A how to video is available for viewing at In Good Flavor.
Brownie Stuffed Swirled Marshmallow Pops
Recipe details
Ingredients
- 15 1/2-inch cubes of a fudgy brownie
- 1 tbsp. vegetable oil
- 15 regular size marshmallows
- 1 12-oz. bag white candy melt
- 1/2 cup pink candy melt
- 15 6-inch cookie sticks
Instructions
- Shape brownies into 1/2-inch wide logs. If there is excessive crumbling, add a few drops of milk to moisten while shaping.
- Apply oil to the tip of a butter knife. Insert knife into the center of each marshmallow using twisting motion to create a cavity. Reapply oil to knife as necessary to prevent sticking.
- In a microwave proof bowl, melt the white candy melt for 1 minute at 50% power. Stir even if it does not look melted. Microwave for 30 seconds at 50% power. Stir well. It should be smooth and creamy. If not, microwave for 20 seconds at 50% power. Stir well.
- Use a greased fingertip to widen the center of the marshmallow if the cavity is too small. Dip a brownie into the candy melt. Insert brownie into the marshmallow. Dip a cookie stick tip into the white chocolate. Insert deep into the center of the marshmallow without going all the way through. Repeat until all the marshmallows are stuffed.
- In a microwave proof bowl, melt the pink candy melt for 30 seconds at 50% power. Stir even if it does not look melted. Microwave for 30 seconds at 50% power. Stir well. Repeat melting for 30 seconds at 50% power, if needed.
- Pour pink candy melt into a plastic storage bag. Work candy melt into one of the corners. Twist close and snip off a tiny slice off the tip. Pipe a pattern over the white chocolate (I use an asterisk pattern).
- Dip a marshmallow straight down into the candy melt, twisting once it is halfway submerged. Twist in the opposite direction while pulling it out. Stand marshmallow pop upright in styrofoam block or a container filled with rice.
- Drizzle in more pink candy melt as needed and repeat dipping the remaining marshmallows.
- Candy melt will harden while sitting out at room temperature. Store at room temperature in an airtight container.
Tips
- Optional: scoop out a little dollop of white candy melt to use for stuffing the marshmallow with brownies to prevent crumbs from mixing with the candy melt that will be used for swirling.
- If the cookie sticks are loose when you are trying to swirl in candy melt, chill marshmallow for a few minutes to allow the candy melt to set quickly.
- If candy melt becomes too thick to swirl, microwave for a few seconds to soften, as needed.







Comments
Share your thoughts, or ask a question!
Is there a video? They are beautiful in the pictures, but a video would clarify a bit of confusion I have.