No-Bake Pumpkin Pie

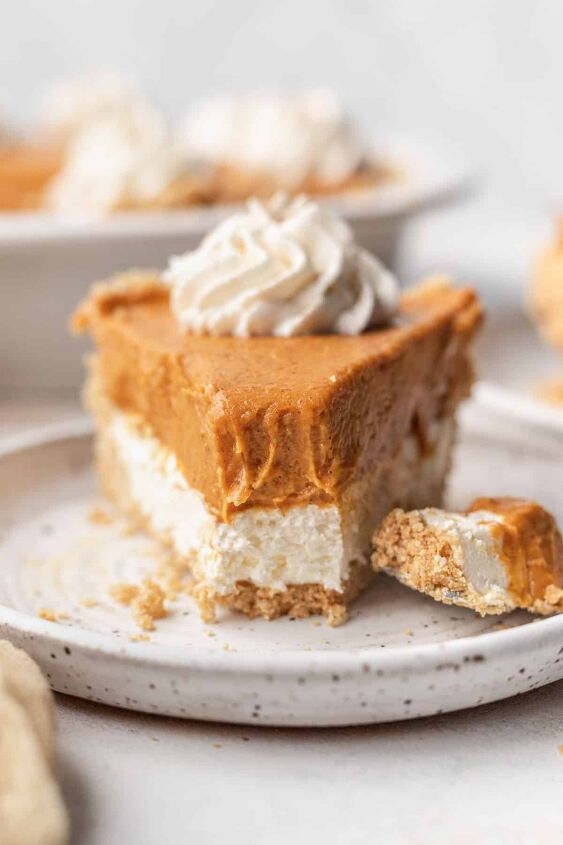
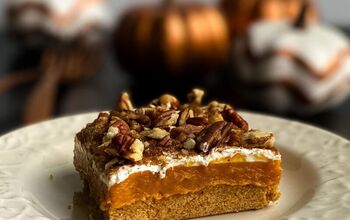
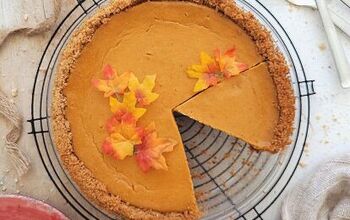
This no-bake pumpkin pie has a buttery graham cracker crust, a decadent cream cheese layer, and is topped with a spiced pumpkin layer. Each bite is bursting with flavor!
 Click HERE for this recipe & more over on my blog: https://bakeandbacon.com/
If you're looking for the best pumpkin pie recipe, look no further. This double-layer pumpkin pie is my grandmom's recipe and she would always make it for Thanksgiving. It's so easy to make and the combination of the spiced pumpkin layer + the sweet cream cheese layer is the perfect combo. I added my own homemade graham cracker crust, but store-bought is fine too!
If you are looking for another easy no-bake pie, check out my Peanut Butter Pie- it's my FAVORITE. My Salted Caramel No-Bake Cheesecake is a great option as well!
Recipe Ingredients
Here are some notes on a few ingredients- please see the full ingredient list in the recipe card below!
- graham crackers- I used regular honey graham crackers but cinnamon would be great too!
- cream cheese- this gives flavor to our "cheesecake" layer. I prefer to use a block of cream cheese. You can use a tub of cream cheese just make sure it's not the whipped kind.
- cool whip- like the tubs you find in the freezer section! Let it thaw before using.
- vanilla pudding- we are just using the powder for this recipe so you don't need to actually make the pudding
- pumpkin puree- make sure to buy plain pumpkin puree or canned pumpkin, NOT pumpkin pie mix, as that is pre-sweetened and would make your pie way too sweet!
Step by Step Instructions
Step 1: Make the pie crust (or buy a graham cracker pie crust and skip this step)
- Use a food processor or blender to blend the graham crackers into a fine crumb. If you don't have a food processor/blender, place graham crackers in a ziploc bag and smash them using a rolling pin or something similar. Make sure there are no big pieces left.
- Place crumbs into a bowl and mix with melted butter and sugar. Pour this mixture into a 9inch pie plate. Press the crumbs into the bottom and up the sides of the pie plate, making sure to really pack it in. I like to use the back of a ¼ cup measuring cup to pack them in.
- Place the crust in the freezer for 2 hours to set.
Step 2: Make the cream cheese layer
- In a large bowl, mix together the softened cream cheese, 1 tbsp of half & half, and sugar until smooth. Gently fold in the cool whip until combined. Spread this evenly over the bottom of the frozen pie crust.
Step 3: Make the pumpkin layer
- In another large bowl, use a whisk to mix the pudding mix and 1 cup of half & half until well blended (1-2 minutes). Let this mixture stand for 3 minutes. After letting it stand, mix in the can of pumpkin, cinnamon, ginger, and cloves. Spread this evenly over top of the cream cheese layer.
Step 4: Place in fridge to set
Once you have layered the pumpkin on top, place it in the fridge for at least 3 hours to set. This is important because if you take it out too early, it will be a runny mess when trying to cut. The longer it sits in the fridge the better.
Once you are ready to serve, top with fresh whipped cream (my homemade recipe is below) and slice.
Frequently Asked Questions
Can I make this ahead of time?Yes! Make the pie and store it in the fridge, I suggest making it no more than a day in advance. I would also wait to add whipped cream on top until ready to serve!
Can I use a store-bought crust?Absolutely. If it's more convenient for you, get yourself a graham cracker crust from the store. If you have the time and want to make your own, you can do that as well! Both work just fine.
Is canned pumpkin the same as pumpkin pie filling?No! They are different. Canned pumpkin (or pumpkin puree) is just pureed and steamed pumpkin with nothing added. Pumpkin pie filling is sweetened with sugar and spices. This recipe uses canned pumpkin.
Tips and Tricks
- Time-saving tip: buy a 9inch store-bought graham cracker crust instead of making your own to save time in the kitchen!
- A food processor is the easiest way I've found to make a homemade graham cracker crust- I got this smaller food processor on Amazon and it works great and doesn't take up a ton of space/cost a lot!
- Let the pie set in the fridge- don't rush this process or else your pie won't set properly and be a runny mess when trying to cut into it!
- I piped my homemade cool whip with a piping bag and tip, but you can also just spread it on top or use store-bought cool whip!
Storing & Freezing
This cool whip pumpkin pie can be stored in the fridge for 2-3 days. For optimal freshness, cover with plastic wrap and store in the pie dish.
You can also freeze this pie for up to 2 months, I recommend freezing without the whipped cream on top. Thaw by placing in the fridge overnight.
Want to try more no-bake recipes?
No-Bake Pumpkin Cookies
Salted Caramel No-Bake Cheesecake
White Chocolate Chex Mix
Peanut Butter Pie
If you made this recipe, I would love to know what you thought! Leave me a star rating and a comment below ⭐️ Your reviews not only help my business but other bakers as well!
Want an exclusive first look at all my recipes? Join my email newsletter which sends Bake & Bacon recipes straight to your inbox as soon as they go live, so you never miss a recipe!
Want to keep up with Bake & Bacon outside of the blog? Follow me on Instagram, Facebook, Twitter, Pinterest, and Youtube. Tag me on any social media and use the hashtag so I can see what you are baking!
📖 Recipe
This post contains affiliate links which means if you purchase something off of one of those links I make a small commission at no extra cost to you. Thanks for supporting my blog!
No-Bake Pumpkin Pie
Recipe details
Ingredients
Graham Cracker Crust
- ▢ 1 1/2 cups graham cracker crumbs about 9-10 full crackers
- ▢ 5 tbsp unsalted butter melted
- ▢ 1/4 cup granulated sugar
Pie
- ▢ 8 oz cream cheese softened
- ▢ 1 cup + 1 tbsp half and half cold (separated)
- ▢ 1 tbsp granulated sugar
- ▢ 1 1/2 cup cool whip thawed
- ▢ 2 packages vanilla pudding 4 serving size/3.4 oz
- ▢ 15 oz can of pumpkin puree
- ▢ 1 tsp cinnamon
- ▢ 1/2 tsp ginger
- ▢ 1/4 tsp cloves
Whipped Cream
- ▢ 1/2 cup heavy whipping cream cold
- ▢ 1 tbsp powdered sugar
- ▢ 1/4 tsp vanilla extract
Instructions
Pie crust (if using store-bought pie crust, skip these steps)
- Use a food processor or blender to blend the graham crackers into a fine crumb. If you don't have a food processor/blender, place graham crackers in a ziploc bag and smash them using a rolling pin or something similar. Make sure there are no big pieces left.
- Place crumbs into a bowl and mix with melted butter and sugar. Pour this mixture into a 9inch pie plate. Press the crumbs into the bottom and up the sides of the pie plate, making sure to really pack it in. I like to use the back of a ¼ cup measuring cup to pack them in.
- Place the crust in the freezer for 2 hours to set.
Pie filling
- In a large bowl, mix together the softened cream cheese, 1 tbsp of half & half, and sugar until smooth. Gently fold in the cool whip until combined. Spread this evenly over the bottom of the frozen pie crust.
- In another large bowl, use a whisk to mix the pudding mix and 1 cup of half & half until well blended (1-2 minutes). Let this mixture stand for 3 minutes. After letting it stand, mix in the can of pumpkin, cinnamon, ginger, and cloves. Spread this evenly over top of the cream cheese layer.
- Place pie in the fridge for at least 3 hours to set.
Homemade whipped cream
- Place the heavy cream, powdered sugar, and vanilla in a large bowl. Use an electric mixer to beat on high speed for 2-3 minutes, or until stiff peaks form.
Tips
- Storing: This can be stored in the fridge for 2-3 days. For optimal freshness, cover with plastic wrap and store in the pie dish. You can also freeze this pie for up to 2 months, I recommend freezing without the whipped cream on top. Thaw by placing in the fridge overnight.
- Time-saving tip: buy a 9inch store-bought graham cracker crust instead of making your own to save time in the kitchen!
- A food processor is the easiest way I've found to make a homemade graham cracker crust- I got this smaller food processor on Amazon and it works great and doesn't take up a ton of space/cost a lot!
- Let the pie set in the fridge- don't rush this process or else your pie won't set properly and be a runny mess when trying to cut into it!
- I piped my homemade cool whip with a piping bag and tip, but you can also just spread it on top or use store-bought cool whip!










Comments
Share your thoughts, or ask a question!
Do you use instant or regular pudding mix?
I have made this delicious treat a couple times a year for about the last 20 years. Most of the time I put the whipped cream on top before putting it in the freezer.
It's even better when it is eaten straight from the freezer without thawing...so good!