Cherry Galette Tart Recipe

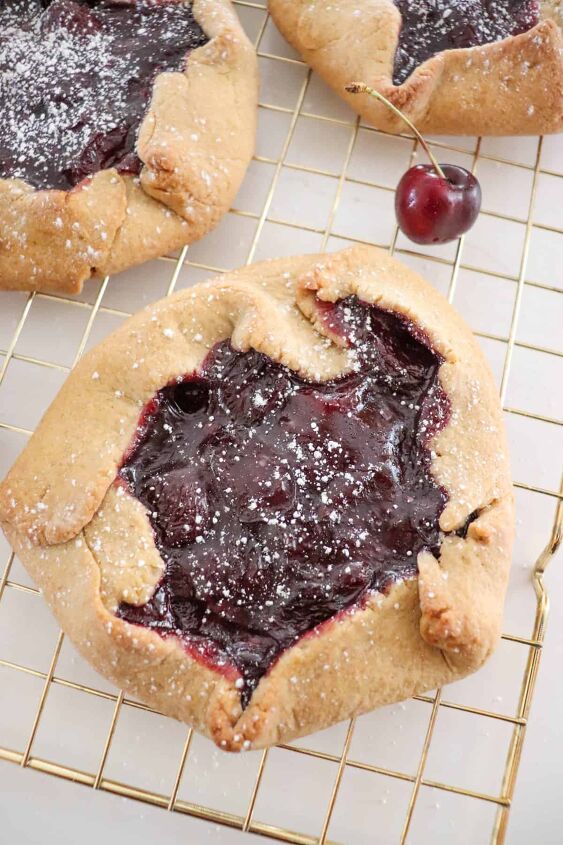
Experience the rustic charm of a luscious cherry galette tart. Bursting with fresh cherries and encased in a sweet crust, this dessert is pure bliss.
This rustic cherry galette combines my grandmas homemade pie crust with delicious, easy to make cherry-pie filling in a way that everyone is sure to love! These simple cherry tarts are the perfect way to enjoy the summer-time cherry harvest this year.
Too busy to make this right away? Pin it for later! Pin this post to your favorite board on Pinterest and it will be there when you’re ready!
Cherries are abundant in the Okanagan and luckily we have friends who allow us to pick fresh cherries straight from the trees in their yard! They are one of our favorite fruits.
This great recipe is the first thing that I make with our cherry haul. A close second would be these easy cherry puff pastry turnovers – a must try!
I love that this uses my grandmas tart crust recipe, you can find it used in these lemon tarts and pumpkin tarts as well. It makes the perfect base for the sweet cherry pie filling!
This post contains affiliate links.
- Cherry pitter – this is a great one but a sharp pairing knife works too!
- Medium bowl – this pyrex set is my go-to.
- Measuring cups and spoons – these ones are awesome!
- Medium pot – for making the homemade cherry filling.
- Rubber spatula – for stirring the filling.
- Rolling pin – mine is thrifted but this one is similar!
- Parchment paper – a must have for all of my baking.
Here are a few of the basic pantry staples that you will need to get started with this easy recipe.
- Sweet cherries – any variety will work in this recipe however Bing cherries are our favorite.
- Cornstarch – to help thicken the pie filling.
- All purpose flour – this is my go-to flour choice for most recipes.
- Brown sugar – is key in making the homemade pie dough.
- Butter – gives the crust a flaky texture.
- Powdered sugar – for dusting the final tarts.
I like to experiment in the kitchen and use what I have. Here are a few substitute suggestions if you’re the same way…
- If you are looking for a more traditional flaky crust, you may want to consider using a puff pastry sheet instead of the pie crust dough.
- Fresh lemon juice works the best for creating the filling however lemon zest or lemon juice concentrate works too.
- White sugar will work in the dough instead of brown but it won’t have the same rich flavor.
- In a medium mixing bowl combine butter and brown sugar. Add egg and vanilla.
2. Mix in flower and combine until a soft dough forms.
3. Cover with plastic wrap and refrigerate for at least 30 minutes.
4. In a medium sauce pan combine cherries and 1 cup of water.
5. Heat over medium high until the cherry mixture is simmering.
6. In a small bowl combine cornstarch and 1/2 cup water. Stir until there are no lumps.
7. Add the cornstarch slurry, sugar and lemon juice to the cherries.
8. Cook over medium until the filling starts to thicken, remove from heat.
9. Pre heat oven to 350 degrees Fahrenheit. Line a large baking tray with parchment paper.
10. Remove the dough from the fridge and place on a lightly floured surface.
11. Divide the dough into 4-6 equal parts.
12. Use a rolling pin to flatten and shape each portion into a 6 inch circle that is about 1/4″ thick.
13. Add a 1/3 cup of cherry filling to the center of each round of dough.
14. Fold edges of the tart dough around the filling, folding the sides over as you go.
15. Bake for 20 minutes or until the crust is golden brown around the edges.
16. Remove from the oven and dust with powdered sugar.
17. Serve with a scoop of vanilla ice cream of dollop of whipped cream.
- Be sure to use a non stick baking tray covered in parchment paper so that the tarts do not stick to the surface.
- For a crispy crust create an egg wash. Take a beaten egg and brush it over the tart shell with a pastry brush. Then sprinkle an even layer of white sugar over that before baking.
- Allow the rustic tarts to rest for at least 5 minutes before cutting into them. This will allow the cherry pie filling to set.
- Leftover tarts may be sealed in an airtight container and kept on the counter for a few days.
This rustic cherry tart recipe is a must make this cherry season! I hope that you love this hand-me down recipe as much as we do.
If you love this rustic cherry tart recipe, please give it a five star review and help me share it on Facebook or Pinterest!
Cherry Galette Tart Recipe
Recipe details
Ingredients
- 4 cups fresh cherries, pitted
- 1 cup water
- 1/4 cup white sugar
- 1 tsp lemon juice
- 1/4 cup cornstarch
- 1/2 cup water
- 2/3 cup butter
- 1/2 cup lightly packed brown sugar
- 1 egg
- 1 tsp vanilla extract
- 1 1/2 cups flour
- 2 Tbsp powdered sugar
Instructions
- In a medium mixing bowl combine butter and brown sugar. Add egg and vanilla.
- Mix in flour and combine until a soft dough forms.
- Cover with plastic wrap and refrigerate for at least 30 minutes.
- In a medium sauce pan combine cherries and 1 cup of water.
- Heat over medium high until the cherry mixture is simmering.
- In a small bowl combine cornstarch and 1/2 cup water. Stir until there are no lumps.
- Add the cornstarch slurry, sugar and lemon juice to the cherries.
- Cook over medium until the filling starts to thicken, remove from heat.
- Pre heat oven to 350 degrees F. Line a large baking tray with parchment paper.
- Remove the dough from the fridge and place on a lightly floured surface.
- Divide the dough into 4-6 equal parts.
- Use a rolling pin to flatten and shape each portion into a 6 inch circle that is about 1/4" thick.
- Add a 1/4 cup of cherry filling to the center of each round of dough.
- Fold edges of the tart dough around the filling, folding the sides over as you go.
- Bake for 20 minutes or until the crust is golden brown around the edges.
- Remove from the oven and dust with powdered sugar.
- Serve with a scoop of vanilla ice cream of dollop of whipped cream.










Comments
Share your thoughts, or ask a question!