


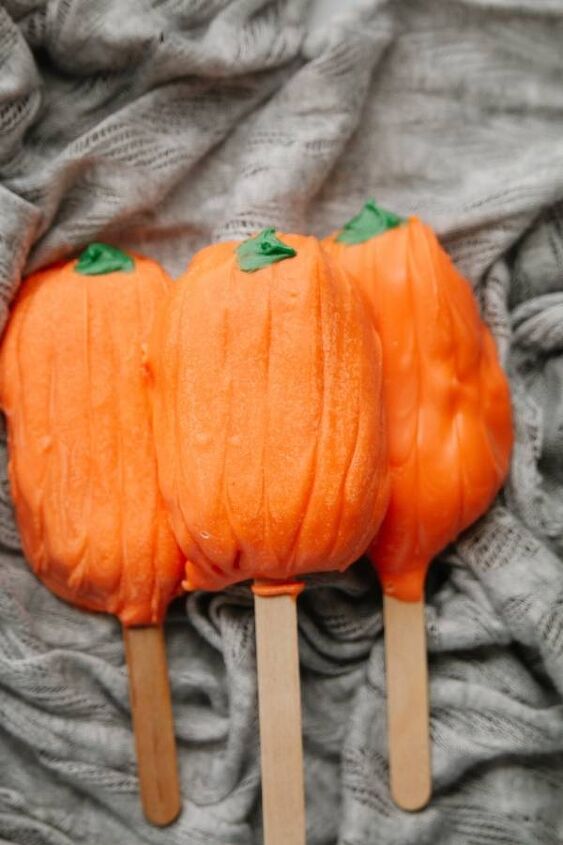
Halloween Cakesicles: How to Make Pumpkin Popsicle Cake Pops
These colorful Halloween cakesicles are the fall desserts of dreams. They’re quick to make and even quicker to devour. Perfect for your Halloween parties or autumn gatherings, these pumpkin popsicle cake pops are made using chocolate box cake mix for a delicious, seasonal fall treat.

Halloween Cake Popsicles
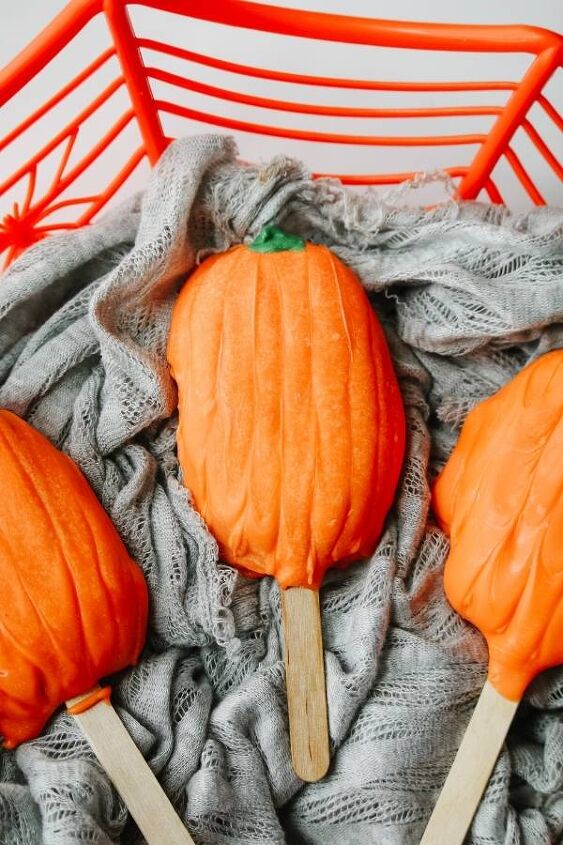
Fall is all about the crisp, cool weather and falling leaves; those cozy sweaters and corduroy. But most of all, autumn brings pumpkins to mind. These festive pumpkin cake pops with candy coating are an easy, bite size dessert that both kids and adults will enjoy!
If you need easy ideas for your upcoming Halloween party, or simply a fun after school snack for the kids this autumn, these pumpkin cakesicles are both a cute and delicious treat. As they’re made using box cake mix, it means fewer ingredients you need to buy. So, it’s also an affordable option when you want to create home baked goods without breaking the bank.
What Are Cakesicles?
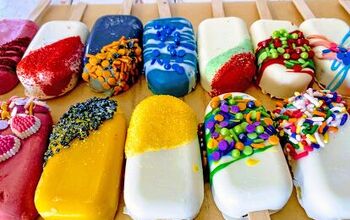
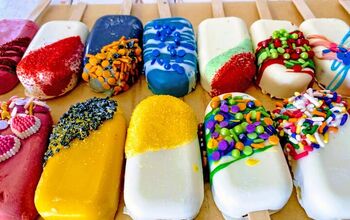
Cakesicles are basically a pumped up version of cake pops. They’re made pretty much the same way. However, the shape is much larger. Instead of small, round cake balls that can be eaten in a single bite, these dessert cakes are more the size of Hostess Ho Ho’s. They are made using a small popsicle mold, rather than a spherical one.
If you’re looking for a whimsical dessert that’s not only fun, but filling, this solution is ideal. Just like their other cake counterparts, these Halloween dessert cakes can be decorated in a variety of ways. While I decorated my miniature, single serving cakes to look like pumpkins, you can also decorate these with chocolate drizzle and sprinkles for a festive alternative. Or use other colors of candy to make them look like mummy cakesicles or even a ghoul or goblin.
Spelled as cakesicles and not cakesickles, this upgraded dessert recipe is sure to delight trick-or-treaters, party goers and everyone in between.
Ingredients for Halloween Pumpkin Cake Pops
This fall dessert is made using box cake mix for the actual cake pops. It is then decorated using colored orange and green candy melts to give these treats the appearance of pumpkins. In addition to the cake mix and candy melts, these are the ingredients you will need to make these Halloween jack-o-lantern cake popsicles.
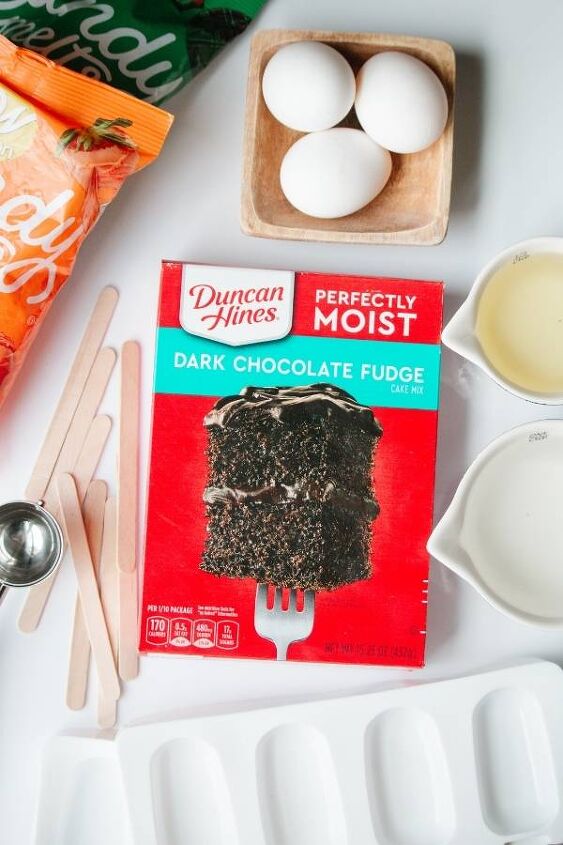
- Box Cake Mix: This recipe for Halloween cakesicles uses box cake mix. I used a box of Duncan Hines Chocolate Cake Mix to make mini chocolate cakes on a stick.
- Eggs: In order to make the cake as directed on the back of the box, you will need eggs to the ingredients. Eggs add structure, texture and flavor when used in baking. They will also help to create a moist cake that’s ideal for these Halloween treats.
- Vegetable Oil: I recommend that you use a neutral vegetable oil to recreate this autumn dessert. A neutral oil is one that has little or no flavor. You can use regular vegetable oil. Or substitute it with canola, sunflower, peanut or grapeseed oil. However, it is necessary for a moist cake. It also helps to bind the mix so it holds its form and you don’t end up with a crumbling cake.
- Water: Water is also used to create the cake batter and is called for in the directions on the back of the cake mix box.
- Wilton Candy Melts: Green and orange candy melts are used to decorate these popsicle cake pops. It can either be dunked or poured over the baked cakes once they’ve been baked and frozen to make them look like Halloween pumpkins. As you’re using pre-colored candy melts, you won’t need to add food coloring.
- Frosting (optional): Sometimes the baked cake doesn’t bind as it should or it dry after baking. If this is the case, you can add frosting to the cake mixture before placing it into the popsicle mold.
- Chocolate (optional): If desired, you can use melted dark chocolate or white chocolate to add additional details to these holiday desserts such as a jack-o-lantern face or decorative leaves. You can also add ribs, or indented ridges, down the length of the pumpkins. Or simply add a drizzle of melted chocolate.
Tools and Equipment
In order to bake and decorate these Halloween treats, you’ll need some basic kitchen tools and equipment. Here’s what you’ll need to get started.
- Stand Mixer with Paddle Hook: If you’ve had your eye on purchasing a KitchenAid stand mixer, this is the perfect project for it! You’ll use a mixer to bind the baked cake to create these pumpkin decorated, Halloween cakesicles However, if you don’t own one and it’s outside of your budget, put it on your holiday wishlist! In the meantime, you can also use a handheld mixer instead.
- Toothpicks: These make handle tools when decorating your Halloween cakes. They’re used to add small design elements to the melted candy. If you don’t wish to purchase toothpicks, you can also use the prong of a fork instead.
- Parchment Paper: As you’re working with melted candy, parchment paper comes in handy. It’s used to prevent the melted candy or chocolate coating from sticking to your working surface.
- Ice Cream Scoop: You will need a small ice cream scoop to fill the molds used to make these Halloween cake pops. Alternately, you can use a large spoon if necessary.
- Cakesicle Mold: You will need several silicone cakesicle molds for this recipe. As it yields about 24 cake popsicles, you can either make this dessert in batches or all at once depending on the number of molds available to you. This mold creates popsicle shaped cakes rather than cake balls.
- Popsicle Sticks: No popsicle is complete without the stick! I used standard, wood popsicle sticks for these delicious treats as they are both inexpensive and convenient. They’ll also hold the weight better than paper lollipop sticks due to the size.
- Bowls: You’ll need a large bowl to blend the cake mixture prior to baking and in addition to the stand mixer. You’ll also need two smaller bowls for each of the colors of the candy melts. I recommend that you use heat-safe, glass bowls for the best results.
- Microwave: You’ll use a microwave to melt the Wilton candy that’s used for decoration.
- Baking Sheet: A baking sheet is necessary to bake these treats. It’s also the easiest way to transfer your baked cake to and from the freezer after you remove them from the oven.
- Cake Pan: To make these Halloween cakesicles, you will first need to bake the cake as called for in the directions on the back of the box of mix. Therefore, you need a cake pan or baking pan.
- Large Spoon or Spatula: You will need a large utensil, such as a serving spoon or spatula to remove the baked cake from the pan so it can be transferred to the mixing bowl of a stand mixer.
How to Make Halloween Cakesicles
Here is how to make this fun, pumpkin snack cake recipe for Halloween.
Bake the Box Cake Mix
1. Begin by preparing box cake mix per the instructions on the back of the box. I recommend that you use the standard ½ cup of vegetable oil rather than the 1/3 cup called for in the directions. This will ensure the cake is moist and will help to bind the ingredients together as a cakesicle.
TIP: Adjust the directions for preparation as needed if swapping out the brand or flavor.
2. Combine and blend the cake mix with the water, eggs and oil as indicated on the box. Then bake at the appropriate temperature for the length of time indicated base on the baking pan you’ve chosen, generally between 25-30 minutes. Make sure that you preheat the oven first to the temperature indicated.
Mix Baked Cake Mixture to Create Cakesicle Dough
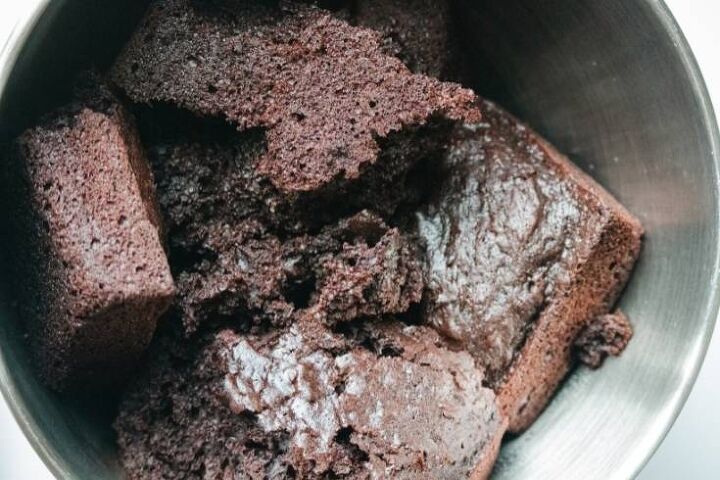
3. After the cakes bakes, immediately scoop it out of the pan using a spatula or large serving spoon. Take care when doing so to prevent accidental burns from both the hot cake as well as the pan used for baking. Spoon the cake in its entirety into the stand mixer bowl before the cake cools.
TIP: By mixing the baked cake while it’s still hot and moist, it will help it stay bind together into a tight, dough-like ball.
4. Mix the baked cake on low speed until it has binded into a ball in the center of the bowl. The cake popsicle mixture should be the consistency of cookie dough.
TIP: If it is not binding like it should into a ball, you can add in 1-2 tablespoons of frosting to assist with the process.
5. Once the Halloween cakesicle dough is ready, place the popsicle molds onto a cutting board. Then, with clean hands, use an ice cream scoop to remove a large heap of the mixture.
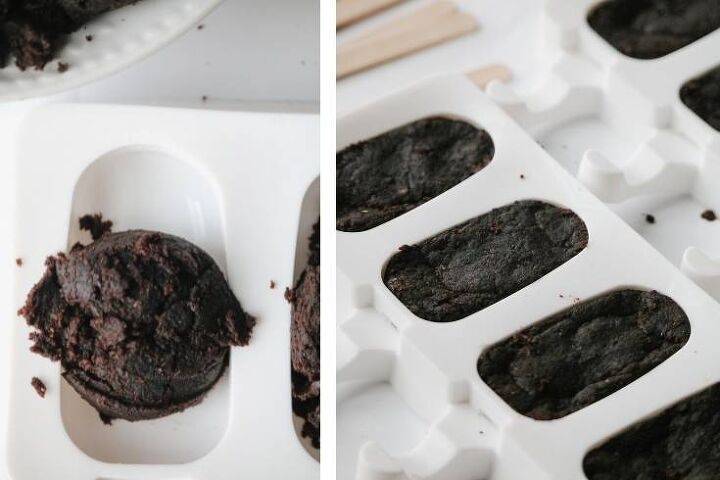
Fill the Cakesicle Molds
6. Place the scoop of snack cake dough into the center of one cavity of the popsicle mold. Then, press the dough into the mold so that is even with both the top and the sides of the mold.
TIP: If there’s too much of the cake mixture in the mold, simply use a knife to level off the top.
7. Repeat this process until you have filled all available molds with the filling.
Insert Popsicle Sticks Into Cake
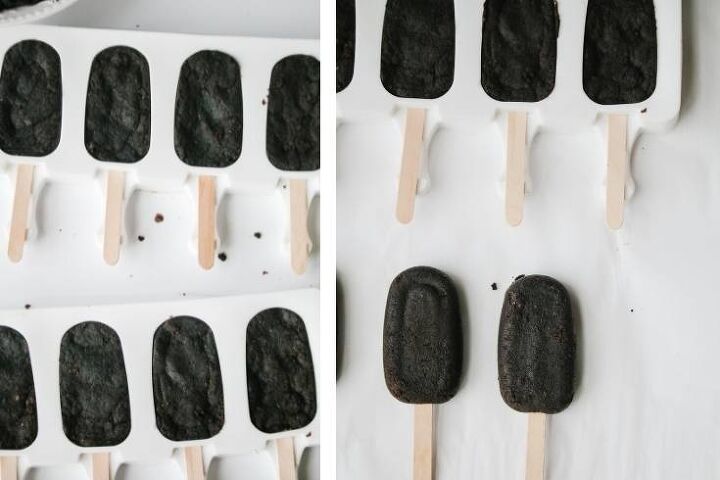
8. Next, insert the popsicle sticks into the cakesicle mold and through the snack cake filling.
TIP: The dough may rise slightly in the mold once a stick is inserted. Should this happen, gently press it back down.
9. Use the cutting board to transfer the filled molds to the freezer. Then freeze the Halloween cakesicles in the molds for one hour.
TIP: Freezing the cake popsicles will prevent them from falling apart in the melted candy. Therefore, it’s not recommended that you remove the frozen cake pops from freezer until you are ready to decorate them.
Decorate the Cakesicles to Look Like Pumpkins
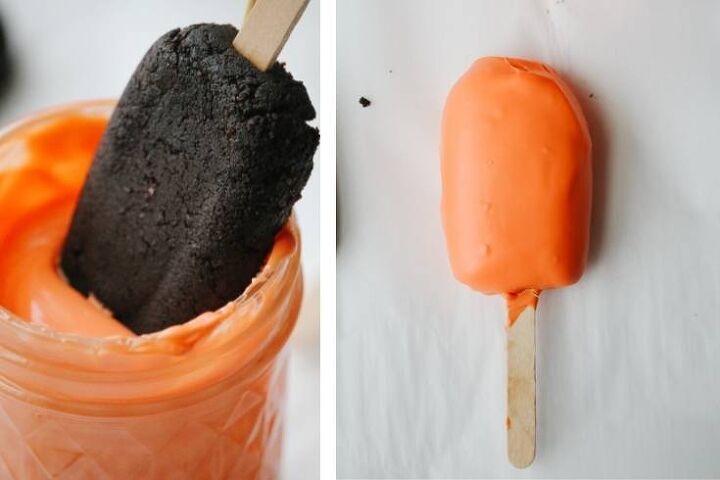
10. Once the holiday snack cakes are about to come out of the freezer, add 2 cups of orange candy melts to a small glass bowl. Follow directions on the package to melt.
TIP: For best results, don’t add any liquids to the candy. If it’s not smooth enough after melting, you may add a teaspoon of coconut oil at a time. Then stir until you reach the desired consistency.
11. After the candy has melted, allow cool slightly, approximately 3-5 minutes.
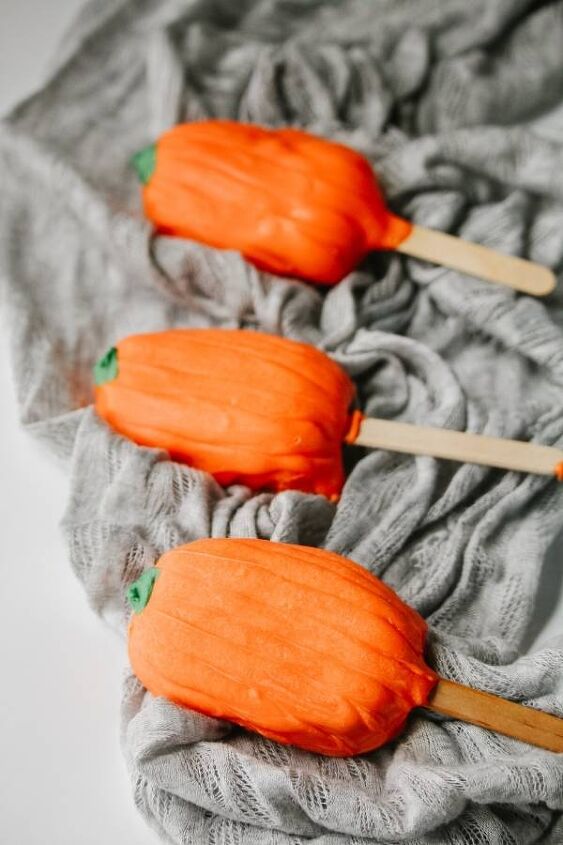
12. Next, take one or two undecorated cakesicles out of the freezer at a time. Begin decorating each one either by dunking or spooning the orange chocolate over the dessert cake.
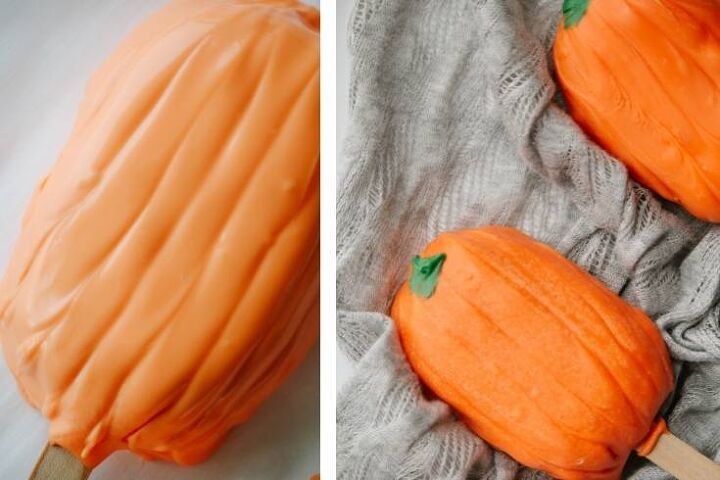
13. Gently shake the pop to even out the candy coating and remove any excess. Then immediately draw the lines for pumpkin ribs into the candy using a toothpick.
14. Set the orange pumpkin cakesicle onto a parchment paper lined baking sheet or tray. Then allow the candy shell to harden for 5-10 minutes.
15. Repeat the process with the remaining Halloween cake pops.
16. Now add ½ cup of green candy melts to a small glass bowl. Follow directions on the package to melt, allowing to cool slightly before use.
17. Once the orange candy has hardened, use a toothpick to draw a green pumpkin stem onto each of the treats. Then allow to harden.
Package and Store the Halloween Cake Pops
18. Store the decorated Halloween cakesicles in the fridge in a Ziploc bag or in a covered container until ready to serve. You may also place each one inside a treat bag for Halloween party favors.
Discover tips and tricks for making these Halloween cake pops here in addition to more fun recipe ideas for your Halloween party.
Halloween Cakesicles: How to Make Pumpkin Popsicle Cake Pops
Recipe details
- 24 cake pops
- Prep time: 35 Minutes Cook time: 25 Minutes Total time: 1 hr


Comments
Share your thoughts, or ask a question!