Santa Crepes

5 crepes
40 min

Today, we’re making Santa Crepes!

This special recipe is about as seasonal as it gets. We’re making a quick and simple homemade crepe batter, stuffing it with a no bake peppermint marshmallow cheesecake filling, then decorating it to look just like the big guy.


In case you’ve had a questionable year and need a last minute boost, these crepes are sure to get you on the nice list this year!


First of all, let me say that at first glance, this recipe may look a little intimidating. It looks like there are a lot of steps and a lot of moving parts. But I promise you, these are really very simple to whip up. We do need a little time and patience, but that’s really the only skill required to make this recipe successful.

Let’s start with the crepe batter. We’re going to make a very basic crepe batter that only requires egg, flour, milk, and a little sugar. That’s it! But to make these extra Santa-ified, we’re going to add a healthy dose of red food coloring straight into the batter to help it achieve a nice, bright red color. Whisk it all together, pop it in the fridge to rest that gluten, and we can work on some of our other components.


To fill our crepes, we really can use anything our hearts desire. You could fill crepes with fresh fruit, jam, peanut butter, Nutella, whipped cream, or a myriad of other things. You could even go the savory route and stuff them with ham, cheese, and/or veggies (though, I’d skip the sweet decorations if you want to go the savory route). But, if you really want to capture the magic of Christmas, the peppermint marshmallow cheesecake filling is the way to go.

This is a no bake cheesecake filling, so all we need is some heavy cream that we’ll whip into a whipped cream, some cream cheese, some marshmallow fluff, vanilla and peppermint extract, and a little more red food coloring. Whisk the heavier ingredients together, fold in some whipped cream to lighten it up, and BAM! A sweet and seasonal filling! Now, you’ll have extra filling leftover so you can either a: make a double batch of crepes, or b: transfer your extra filling to a dish, top it with crushed Oreos, and have yourself a little dessert for later.


After the cheesecake filling is ready, we’re going to make another batch of whipped cream that we’ll use for finishing the crepes, and that can go to the fridge to chill and hang out too. We can use the same bowl we used to make the cheesecake (actually, it makes more sense to make the whipped cream first and then the filling), and that means no extra dishes to clean. And if you didn’t feel like making a homemade whipped cream, I certainly wouldn’t tell anyone that you used the canned kind. That would work beautifully here too.


Here’s the thing about the batter, the filling, and the whipped cream…they all benefit from chilling time in the fridge. You could make all 3 the night before, so all that’s required when you’re ready to eat is cooking, decorating, and serving the crepes.

To cook the crepes, we need a large non stick skillet and some melted butter. I find that brushing melted butter into the pan between batches helps to get more even coverage instead of letting a little pat of butter melt in between each crepe. Then, we’ll swirl in a quarter cup of batter to coat the bottom of the pan, and cook it for just a minute or two on each side until we start to see patches of golden brown. Now, the crepes will cook faster and faster with each batch as the pan gets hotter, so the cooking time can reduce down as far as 30-45 seconds between batches. Just watch for those golden spots.


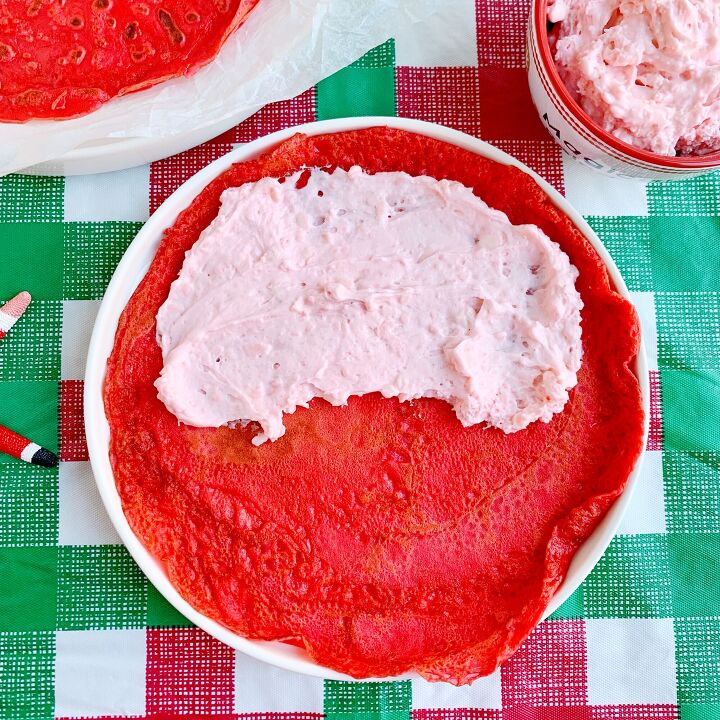
To assemble, we’ll stuff our filling into each crepe, fold it twice to create a cone shape, pipe some whipped cream across the top of the crepe, then finish with a milk chocolate belt decorated with gold edible glitter.


These crepes truly couldn’t be any cuter, and they are definitely the perfect addition to your holiday table this year. You could even set up an assembly line with your loved ones or have a Santa decorating contest to make these crepes more than a meal, but an activity!

It’s officially time to transition into our New Year’s recipes, so stay tuned!


But in the meantime, Merry Christmas; Happy Holidays; enjoy, and let’s eat!

Recipe details
  • 5  crepes
  • Prep time: 30 Minutes Cook time: 10 Minutes Total time: 40 min
Show Nutrition Info
Hide Nutrition Info
Ingredients
For the Crepes
  • ½ cup flour
  • 1 egg
  • ¾ milk (1 used 2%)
  • ½ tbsp granulated sugar
  • ½ tbsp red food coloring
  • 1 ½ tbsp butter, melted
  • 1/3 cup milk chocolate chips
  • gold edible glitter (I used Fancy Sprinkles Prism Powder)
  • sprinkles, for decorating
For the Whipped Cream
  • ½ cup heavy cream
  • ½ cup powdered sugar
For the Peppermint Cheesecake Filling
  • 8 oz cream cheese, softened (I used low fat)
  • 1 cup heavy cream
  • 1 jar (7 oz) marshmallow fluff
  • ½ tsp vanilla
  • ½ tsp peppermint extract
  • 6 drops red food coloring
Instructions

Make Santa's belt buckle: To a microwave safe bowl, add chocolate chips and microwave for 20-30 seconds. Stir. If not completely melted, microwave and additional 5-10 seconds until smooth. Transfer to a piping bag or a sandwich bag with the tip cut off to make a small opening. Line a plate with parchment paper. Use the piping bag to draw the chocolate into 5 squares roughly 1 inch big. Place the plate in the fridge to chill for about 20 mins. Remove from fridge, and use a clean paintbrush or small pastry brush to brush glitter all over the square. Set aside.
Make the crepe batter: Add flour, egg, sugar, and about half of the milk to a mixing bowl. Whisk until it starts to come together. Add remaining milk and ½ tbsp food coloring, and whisk until the batter is smooth. Place batter in the fridge for at least 30 mins or up to overnight.
Meanwhile, make the whipped cream: Add ½ cup heavy cream to the bowl of a stand mixer fitted with the whisk attachment. Whisk on high for 1-2 mins until soft peaks form. Add powdered sugar, and whisk on high for 1-2 mins until stiff peaks form. Transfer whipped cream to a piping bag fitted with the large star tip, and set aside in the fridge.
Make the filling: In the same bowl of a stand mixer fitted with a whisk attachment, whip 1 cup heavy cream on high until stiff peaks form. Remove half of the whipped cream and set aside in a bowl. Switch to the paddle attachment. Add cream cheese, marshmallow fluff, vanilla, peppermint, and 6 drops of red food coloring to the mixer bowl. Beat on medium high speed until the mix is smooth and creamy. Add the reserved whipped cream, and fold it in with a spatula to the cream cheese mixture. Set aside in the fridge to chill.
Finish the crepes: Heat a 9 inch crepe pan (or a 10 inch nonstick skillet) over medium heat. Brush a thin layer of butter all over the pan. Pour ¼ cup of the batter into the pan while lifting the pan slightly off the heat and swirling the pan around until the batter completely covers the bottom of the pan (or covers the bottom of the pan leaving a 1 inch gap around the edges if using a larger pan). You have to multitask and work quickly. Cook for about 1-1 ½ mins until the bottom starts to get patches of golden brown. Very carefully flip the crepe using a spatula and your fingers, and cook for about another minute until you start to see patches of golden brown. Remove from heat, and repeat with remaining crepe batter. (Crepes will cook faster and faster with each batch. Lower the heat to medium low if they are getting too brown too fast.)
Take one crepe, and schmear peppermint cheesecake filling over the top half of the crepe. Fold the bottom half of the crepe up over the filling. Then, fold the crepe in half again to create a cone shape. Repeat with remaining crepes.
Re-melt leftover chocolate in the piping bag by microwaving it an additional 20-30 seconds. Draw a line with the chocolate across the center of the crepe. Top with a gold belt buckle in the center. Pipe whipped cream stars along the top edge of the crepe. Add sprinkles, if desired. Enjoy!
Tips
  • *You can fill these crepes with practically anything. If you don't like peppermint or don't want to make the cheesecake filling, you could fill these with lots of other things. Fruit or fruit spreads, nutella, whipped cream, peanut butter...so many things! You could even make these savory and fill them with things like ham and cheese, mushrooms, or sauteed veggies. I'd skip the chocolate and whipped cream decoration if going the savory route though.
  • *You'll have cheesecake filling leftover. You'll have enough filling to make a double batch of crepes if you want. Or, you could serve the leftover filling in little cups with crushed Oreos as a dessert for later.
  • *You can use lowfat cream cheese or regular cream cheese for the filling in this recipe.
  • *If you don't have a stand mixer, you can whip the cream and make the cheesecake filling with a hand mixer. It'll just take you a little longer, but it works totally the same!
Nicole - The Yummy Muffin
Want more details about this and other recipes? Check out more here!
Go
Comments
Next