PUMPKIN HAUPIA PIE

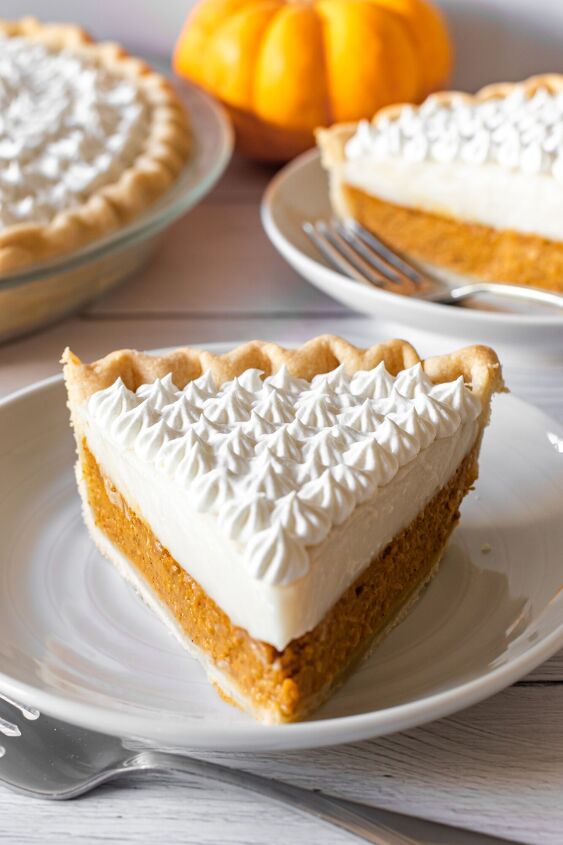
A winning twist on a classic! This recipe turns a delicious, classic pumpkin pie into a whole new experience with the smooth, delicate flavor of coconut haupia. This just might become your new favorite pie!
I absolutely love pumpkin pie! Well, actually, anything made with pumpkin gets me excited! One of the reasons fall is my favorite season is that it is completely acceptable to be obsessed with pumpkin for a few months. When I say obsessed, I mean pumpkin pancakes, pumpkin donuts, pumpkin coffee cake, pumpkin rolls, pies, cookies, bread, and the list goes on and on. Thank goodness my family shares in my love of pumpkin! And pumpkin haupia pie tops the list of favorites in our house!
Pumpkin haupia pie takes a classic recipe – which on its own is amazing! – and makes it delicious in its own unique way. What is Haupia? Haupia is a classic Hawaiian dessert made with coconut milk, sugar, and a thickener, usually cornstarch. Haupia thickens into a Jell-O-like consistency that is smooth, delicate, and creamy. Haupia is often served as a stand-alone dessert eaten at luaus or served with Hawaiian plate lunches. But you will also find haupia layered on other desserts, like this one, for unique and delicious combinations. Combining pumpkin pie with haupia is a winning combination as the pumpkin and coconut from the haupia complement each other perfectly.
For this Recipe:
You will need a 9-inch deep-dish pie crust. You can make your own or buy a pre-made, frozen crust. I like to make my own, but I will buy a pre-made crust from time to time to save time. The best reason for making your own pie crust is there are fewer ingredients than in a store-bought crust. When you make your own, you don’t need all the preservatives and stabilizers that go into a store-bought crust. A homemade pie crust only has 4 ingredients: flour, salt, butter, and shortening. With some practice, you’ll be making your own pie crust with ease. I am putting together a post on making a homemade pie crust, so stay tuned!
- Start by preheating your oven to 425°F. If you bought a premade pie crust, allow it to sit at room temperature for 15 minutes. Meanwhile, mix your pumpkin pie ingredients. This is half of the normal pumpkin mixture you would make for a full pumpkin pie.
- In a small bowl, combine the brown sugar, cinnamon, salt, ginger, and cloves.
- In a medium bowl, beat the eggs and then stir in the pumpkin. Add the sugar mixture to the pumpkin. Then slowly stir in the evaporated milk. Mix well. Pour everything into the prepared pie crust.
- I always use either a pie crust shield or aluminum foil to protect the pie crust’s edge and keep it from over-browning or burning. If you do not have a pie crust shield, you can cut a circle out of aluminum foil, a little larger than the top of your pie. Fold the circle in half and cut out the center. You’ll want to have an aluminum foil ring that is about an inch wide around the edges. Lay it on top of your pie, and gently bend the foil so it protects the exposed pie crust. You can remove the foil for the last 5 to 10 minutes if you desire a little browning on your pie crust.
- Bake the pie for 8 minutes at 425°F, then turn down the oven and bake at 350°F for 20 to 30 minutes. Always check to see if the pumpkin is cooked all the way through by inserting a knife into the center of the pie. If the knife comes out clean, you know the pie is done. If some of the pie filling clings to the knife, bake for an additional 5 minutes and check again. Repeat until done.
- Allow the pie to completely cool on a wire rack before making the haupia. Typically it takes about 1 1/2 hours to cool to room temperature.
For the Haupia:
- In a small bowl, mix the cornstarch and milk. Mix until the cornstarch is completely dissolved in the milk with no remaining lumps.
- In a medium saucepan, over medium heat, add the coconut milk and sugar, and bring to a simmer – but do not boil (it should just start to bubble). Remove from heat, and whisk in the cornstarch mixture. Lower the heat to medium-low, and place the haupia back on the heat. Continually whisk for 10 to 15 minutes until the haupia thickens to a yogurt-like consistency. If it is not thickening up enough, turn the heat up slightly. Even if it reaches the desired thickness, you must cook for 10 to 15 minutes.
- Remove the haupia from the heat, stir in the vanilla, continue stirring for a couple of minutes while it cools; this step helps it cool slightly before adding it to the pie; it also prevents lumps from forming. Finally, pour the haupia onto the pumpkin pie. Smooth out the top and refrigerate until the haupia is completely set about 3-4 hours.
Haupia not setting?
- The number one reason haupia does not set is that you did not cook it long enough. Once you’ve added the cornstarch mixture, you should be cooking your haupia for 10 to 15 minutes, stirring constantly – even if it reaches the desired thickness. Cooking for this length of time is critical in getting haupia to set.
- If you have not fully dissolved the cornstarch in the milk, you may end up with lumps of cornstarch, resulting in lumpy haupia. Make sure that when you mix the cornstarch with milk, that the cornstarch is completely dissolved, and there are no lumps.
- To ensure a smooth haupia without lumps, be sure to use a whisk. A whisk works to smooth out the haupia and prevents lumps from forming while cooking.
Serve with whipped cream and chopped toasted pecans.
Related recipes: LILIKOI CHIFFON CREAM PIELEMON CHIFFON PIE PINEAPPLE SMOOTHIEPUMPKIN BREADCOCONUT LIME MACAROONSCOCONUT TAPIOCA PUDDING
PUMPKIN HAUPIA PIE
Recipe details
Ingredients
- 1 9-inch deep dish pie crust, frozen or homemade
- 1/2 cup brown sugar, packed
- 1/2 teaspoon cinnamon
- 1/4 teaspoon ground ginger
- 1/8 teaspoon ground cloves
- 1/4 teaspoon salt
- 2 eggs
- 1 1/4 cup 100% pure pumpkin
- 3/4 cup evaporated milk
- 5 tablespoons cornstarch
- 1/2 cup milk
- 1 can coconut milk, full fat
- 1/4 cup + 2 tablespoons sugar
- pinch of salt
- 1 teaspoon vanilla
- whipped cream
- toasted, chopped pecans
Instructions
- If using a frozen pre-made pie crust, allow it to sit at room temperature for 15 minutes.
- Preheat oven to 425°F.
- In a small bowl, mix brown sugar, cinnamon, salt, ginger, and cloves.
- Beat eggs in a medium bowl, then stir in 1 ¼ cup pumpkin and sugar mixture.
- Slowly stir in ¾ cup evaporated milk. Pour into the prepared pie shell.
- Cover the edges of your pie crust with either aluminum foil or a pie crust shield. (See notes)
- Bake for 8 minutes at 425°F, then reduce the temperature to 350°F. Continue baking for 30-40 minutes. Check if the pie is done by sticking a knife into the center of the pie. If the knife comes out clean, the pie is done. If the pumpkin filling clings to the knife, bake for an additional 5 to 10 minutes and check again, repeating until pie is done.
- Cool on a wire rack for about 1½ hours.
- After the pie has cooled for 1½ hours, begin making the haupia.
- In a small bowl, mix the cornstarch and milk. Make sure the cornstarch is completely dissolved in the milk, set aside.
- In a medium saucepan, add coconut milk and sugar. Heat over medium heat, stirring frequently, bringing almost to a boil (you should just start to see bubbles).
- Remove from heat and whisk in the cornstarch mixture. Return to the stove and turn down the heat to medium-low. Continually whisk for 10-15 minutes. The mixture should thicken to the consistency of thick yogurt. Be sure to cook for the full 10 to 15 minutes!
- Remove from the heat and stir in 1 teaspoon vanilla. Continue stirring for a couple of minutes while it cools; this step helps it cool slightly before adding it to the pie and prevents lumps from forming.
- Pour the haupia mixture onto the pumpkin pie, and smooth out the top.
- Refrigerate for 3-4 hours to allow the haupia to completely set.
- Serve with whipped cream and chopped toasted pecans.
Tips
- I always use either a pie crust shield or aluminum foil to protect the edge of the pie crust and keep it from over-browning or burning. If you do not have a pie crust shield, you can cut a circle out of aluminum foil, a little larger than the top of your pie. Fold the circle in half and cut out the center. You’ll want to have an aluminum foil ring that is about an inch wide around the edges. Lay it on top of your pie and gently bend the foil so it protects the exposed pie crust. You can remove the foil for the last 5 to 10 minutes if you desire a little browning on your pie crust.






Comments
Share your thoughts, or ask a question!