Croissants

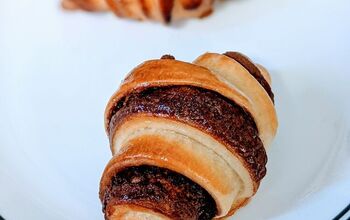
I've always been intimidated by making croissants, but a few months ago I tried and it turns out it's actually extremely easy, it just requires some patience. Let me tell you, nothing beats a fresh croissant on a Sunday morning. I've been starting my Sundays like this for many weeks now and life has never been better.
I do apologise for this being one of the longest recipes on the planet, but I promise you - the actual work time on this is quite minimal, you just need to be at home in the mornings and evenings to work on this.
I will not give US measurements for this recipe, because baking croissants needs to be quite exact, and you cannot get exact results with cups.
My favourite schedule for a Sunday morning fresh croissant batch is to start on Saturday morning. The first 12-hour rest will be done by Saturday evening, second rest will be overnight, and the croissants will be ready by brunch time.
If you like my content you can check here for more!
I realise that simply writing the steps below may be too confusing if you've never made croissants before, so I made a few pictures to help with the process.
- Mix the yeast with water and sugar, stir well and wait 5-10 minutes until it gets frothy on the surface.
- In a large bowl, whisk the flour and salt together – pour in the yeast water, butter, and egg yolk, mix until combined and a smooth-ish ball forms.
- Place back into the bowl, cover with plastic wrap / cloth and place in the fridge for about 15 minutes.
- With the dough still in the bowl, stretch one edge of the dough and fold it over to the other side. Repeat until you’ve gone a full circle, flip over so it’s facing seam side down, cover the bowl and place back in the fridge for another 15 minutes.
- Repeat, cover, and let rest for half an hour in the fridge.
- Place the dough on a piece of wax paper, flatten it slightly, and fold the edges of the paper over the dough, wrapping it into an 18x18cm (7x7inch)
- Now that your dough is wrapped in the paper, gently roll it out into the edges of the square paper so it’s flat and even. Let rest in the fridge for 12 hours (best wrap it up in clingfilm on top to make sure it doesn't dry out).
- Measure out the butter for the butter layer and cut into strips of even thickness. Layer this on another piece of wax paper so that you get a 10x10cm (4x4inch) square of butter. Fold the wax paper over making sure the edges meet the sides of the butter square and are still of the same length. Pat it with a rolling pin so that all the butter layers combine together and soften. Then roll it so that it’s flat and even. Chill in the fridge for 15 minutes.
- Now you have two squares of baking paper in the fridge – one 18x18cm with the dough inside, and one 10x10cm with the butter. All good so far? Great. Take the dough square out of the fridge and unwrap it onto a lightly floured working surface. Lightly flatten it out and elongate it a little bit with your rolling pin.
- Take the butter out of the fridge, unwrap it, and place diagonally on top of the centre of your dough so that you get sort of a diamond shape. Fold the corners of the dough over the butter so you get a square envelope, pinch all the edges shut so the butter is completely encased. Flip it over seam side down.
- Lightly flour the top of the dough and your rolling pin. Press the dough down with your rolling pin multiple times along the length before you start rolling. You’re doing this so that the butter is completely softened inside and spreads out evenly.
- Now start rolling the dough into a long rectangle that’s about 45cm (18inch) long. Make sure you roll it evenly so that the butter gets distributed along the entire length and it’s not bumpy.
- Fold the bottom of the rectangle about 2/3 of the way up, then fold the top part the rest of the way down so that the two ends meet evenly. Pinch them together so they seal. Fold the bottom all the way to the top (essentially fold it in half), pat lightly with your hand so all the layers meet properly.
- Wrap this in a cling film and place in the fridge for one hour.
- Unwrap the dough, place on a lightly floured work surface so that the shorter edge of the dough is facing you – essentially we’re going to roll this into a long rectangle again, but you want to make sure you roll it the other direction than the previous time.
- Same process – press down with your rolling pin multiple times to soften the butter, then roll into a long rectangle, again roughly 45cm (18inch in length).
- Fold the top part about 1/3 of the way down, then fold the bottom part so that it overlaps evenly on the other side, making it a square shape. Pat down with your rolling pin so everything sticks together, wrap it up in cling film, and let rest in the fridge for another 12 hours.
- Take the dough out of the fridge, unwrap it onto a lightly floured work surface. Roll it into a wider and thicker rectangle – about 25cm (10inch) wide rectangle.
- Make little marks along the bottom of the rectangle at 9cm (3.5inch) intervals. Then make little marks along the top of the rectangle so that they’re exactly in between the bottom marks.
- Play connect-the-dots with your knife – bottom mark to nearest top mark, same top mark again to nearest bottom mark etc – you should hopefully be left with long triangles at the end of this.
- Gently stretch the triangles and roll them up starting at the wide end all the way to the tip. Don’t squeeze but do roll them tightly.
- Place on a baking tray layered with baking parchment so the tips of the croissants are facing down (you don’t want them to unroll). Make sure you leave some space between the croissants as they’re going to roughly double in size now.
- Brush lightly with egg wash and cover with another equally sized inverted baking tray. If you don’t have that, put it in the turned off oven with the doors shut. Essentially you don’t want any breeze to get to it so that they don’t dry out. Let them proof for about 2 hours.
- Preheat the oven to 170 celsius (340 fahrenheit) (make sure you take the croissants out first!).
- Brush with egg wash again.
- Bake for 10 minutes, decrease the temperature to 150 celsius (300 fahrenheit) and bake additional 10-15 minutes, until nice and golden brown.
Croissants
Recipe details
Ingredients
For the dough
- 130ml lukewarm water
- 6g instant yeast
- 30g granulated sugar
- 250g bread flour
- 5g salt
- 25g unsalted butter, melted
- 1 egg yolk
- 1 whole egg (for egg wash)
For the butter block
- 140g unsalted butter
Instructions
- Mix the yeast with water and sugar, stir well and wait 5-10 minutes until it gets frothy on the surface
- In a large bowl, whisk the flour and salt together – pour in the yeast water, butter, and egg yolk, mix until combined and a smooth-ish ball forms
- Place back into the bowl, cover with plastic wrap / cloth and place in the fridge for about 15 minutes
- With the dough still in the bowl, stretch one edge of the dough and fold it over to the other side. Repeat until you’ve gone a full circle, flip over so it’s facing seam side down, cover the bowl and place back in the fridge for another 15 minutes
- Repeat the process, cover again, place back in the fridge for half an hour.
- Place the dough on a piece of wax paper, flatten it slightly, and fold the edges of the paper over the dough, wrapping it into an 18x18cm (7x7inch). Now that your dough is wrapped in the paper, gently roll it out into the edges of the square paper so it’s flat and even.
- Place in the fridge and let rest for about 12 hours
- Measure out the butter for the butter layer and cut into strips of even thickness. Layer this on another piece of wax paper so that you get a 10x10cm (4x4inch) square of butter. Fold the wax paper over making sure the edges meet the sides of the butter square and are still of the same length. Pat it with a rolling pin so that all the butter layers combine together and soften. Then roll it so that it’s flat and even. Chill in the fridge for 15 minutes.
- Now you have two squares of baking paper in the fridge – one 18x18cm with the dough inside, and one 10x10cm with the butter. All good so far?
- Great. Take the dough square out of the fridge and unwrap it onto a lightly floured working surface. Lightly flatten it out and elongate it a little bit with your rolling pin.
- Take the butter out of the fridge, unwrap it, and place diagonally on top of the centre of your dough so that you get sort of a diamond shape. Fold the corners of the dough over the butter so you get a square envelope, pinch all the edges shut so the butter is completely encased. Flip it over seam side down.
- Lightly flour the top of the dough and your rolling pin. Press the dough down with your rolling pin multiple times along the length before you start rolling. You’re doing this so that the butter is completely softened inside and spreads out evenly.
- Now start rolling the dough into a long rectangle that’s about 45cm (18inch) long.
- Make sure you roll it evenly so that the butter gets distributed along the entire length and it’s not bumpy.
- Fold the bottom of the rectangle about 2/3 of the way up, then fold the top part the rest of the way down so that the two ends meet evenly. Pinch them together so they seal.
- Fold the bottom all the way to the top (essentially fold it in half), pat lightly with your hand so all the layers meet properly.
- Wrap this in a cling film and place in the fridge for one hour.
- Unwrap the dough, place on a lightly floured work surface so that the shorter edge of the dough is facing you – essentially we’re going to roll this into a long rectangle again, but you want to make sure you roll it the other direction than the previous time.
- Same process – press down with your rolling pin multiple times to soften the butter, then roll into a long rectangle, again roughly 45cm (18inch in length).
- Fold the top part about 1/3 of the way down, then fold the bottom part so that it overlaps evenly on the other side, making it a square shape. Pat down with your rolling pin so everything sticks together, wrap it up in cling film, and let rest in the fridge for another 12 hours.
- We’re almost there!
- Take the dough out of the fridge, unwrap it onto a lightly floured work surface. Roll it into a wider and thicker rectangle – about 25cm (10inch) wide rectangle.
- Make little marks along the bottom of the rectangle at 9cm (3.5inch) intervals. Then make little marks along the top of the rectangle so that they’re exactly in between the bottom marks.
- Play connect-the-dots with your knife – bottom mark to nearest top mark, same top mark again to nearest bottom mark etc – you should hopefully be left with long triangles at the end of this.
- Gently stretch the triangles and roll them up starting at the wide end all the way to the tip. Don’t squeeze but do roll them tightly.
- Place on a baking tray layered with baking parchment so the tips of the croissants are facing down (you don’t want them to unroll). Make sure you leave some space between the croissants as they’re going to roughly double in size now.
- Brush lightly with egg wash and cover with another equally sized inverted baking tray. If you don’t have that, put it in the turned off oven with the doors shut. Essentially you don’t want any breeze to get to it so that they don’t dry out. Let them proof for about 2 hours.
- Preheat the oven to 170 celsius (340 fahrenheit) (make sure you take the croissants out first!)
- Brush with egg wash again
- Bake for 10 minutes, decrease the temperature to 150 celsius (300 fahrenheit) and bake additional 10-15 minutes, until nice and golden brown.


Comments
Share your thoughts, or ask a question!