Halloween Trick-or-Treat Cake

Intensive Cake Unit
by Intensive Cake Unit
1 cake
1 hr 45 min

I can’t think about Halloween without thinking about the candy overload and sugar rush that always followed Trick-or-Treating runs!

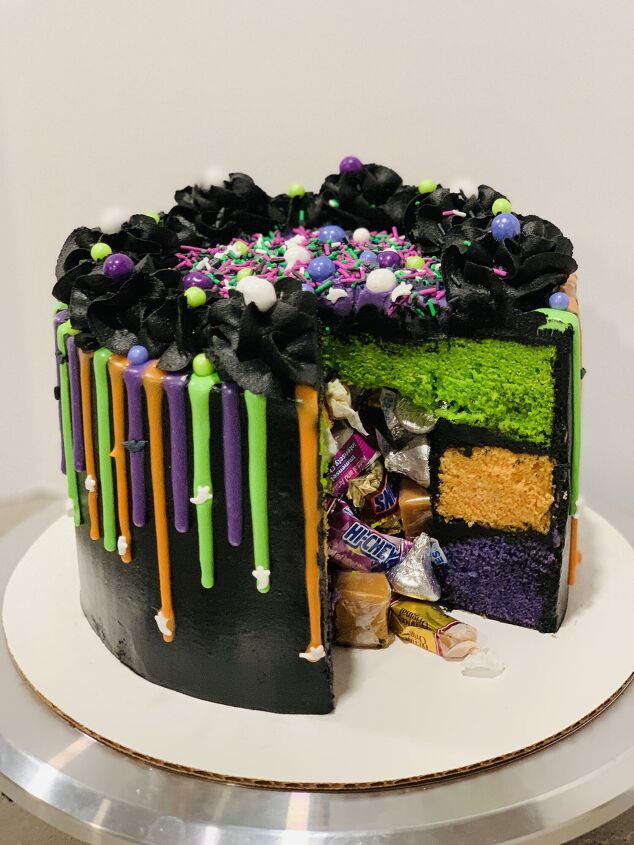
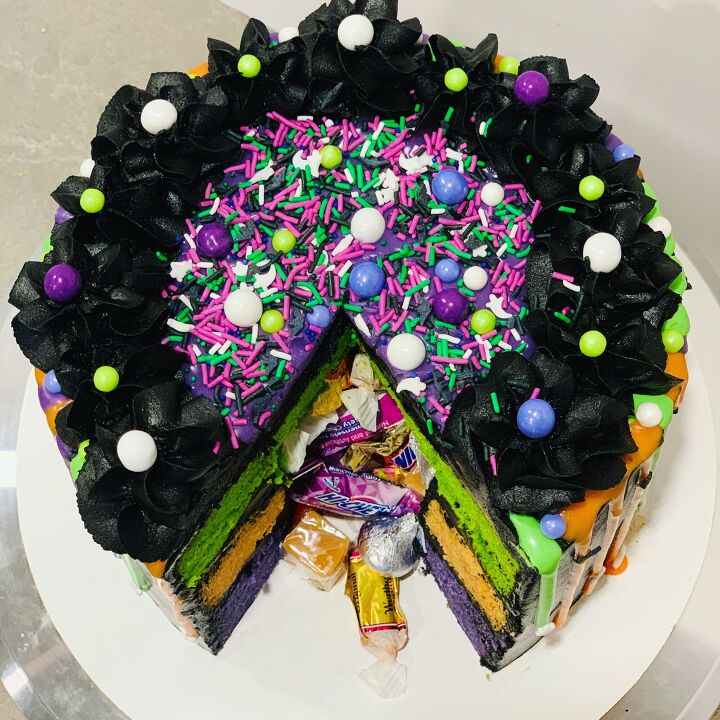
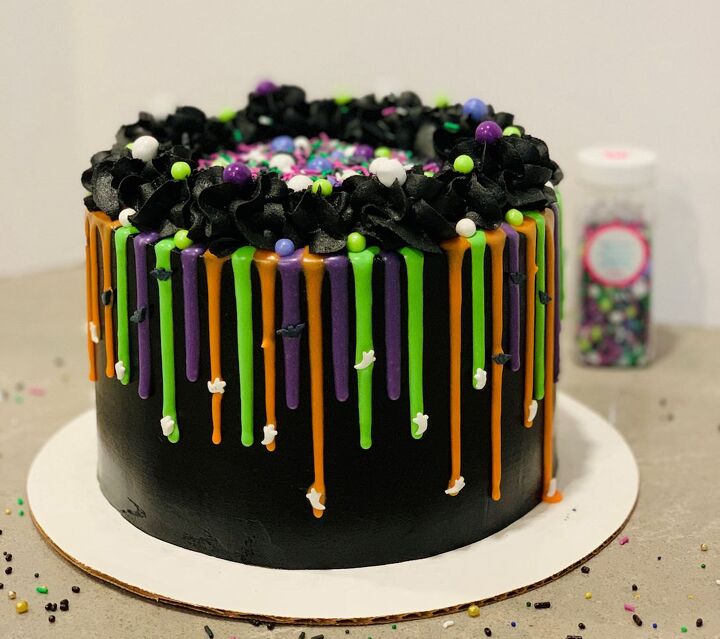
I wanted to make a Halloween cake that incorporated the Halloween candy somehow, even though I already knew how I wanted to decorate it – and so I decided to get a little bit creative and hide it in the middle of the cake!

It almost reminds me of a pinata – I cut out the centers of the bottom two cake layers and filled the cake with about a cup of the candy so it spills everywhere when you cut into the cake – suuper fun! You can leave the wrappers on if you’d like, though rinsing the candy off and drying it before putting it into your cake might not be a bad idea. ;) Recipe below! Have fun!

Halloween Trick-or-Treat Cake
Recipe details
  • 1  cake
  • Prep time: 60 Minutes Cook time: 45 Minutes Total time: 1 hr 45 min
Show Nutrition Info
Hide Nutrition Info
Ingredients
Cake layers
  • 3 1/4 cup all-purpose flour
  • 3 cup granulated sugar
  • 2 1/2 teaspoon baking powder
  • 1 teaspoon salt
  • 1 cup unsalted butter (or 2 sticks) room temperature
  • 2 teaspoons clear vanilla extract
  • 1 cup egg whites (about 7 eggs, or use egg whites from a carton if you don’t want to waste any yolks!)
  • 1 1/2 cups buttermilk, room temperature (or buttermilk powder with water is an option if you can’t find liquid buttermilk at your grocery store!)
  • 1/8 cup (28 grams) vegetable oil 3-4 large drops each orange, green, and purple gel food color (I used Americolor Electric green, Americolor Orange, and Americolor Electric purple)
Frosting and Decorations
  • 8 oz (one package) cream cheese, softened
  • 16 Tablespoons (two sticks) butter, softened
  • 5 ½ -6 cups powdered sugar
  • 1 cup cocoa powder
  • 4-6 Tablespoons milk
  • 1 T vanilla extract 1/4 t. salt (if using unsalted butter)
  • 5-6 large drops black gel food color (I use black pretty frequently, especially around Halloween, so I bought this large bottle from Americolor!)
  • - 1 8- or 10 -inch cardboard cake circle (I prefer Wilton’s center-punched circles) -
  • Medium-sized glass or biscuit cutter (to cut the centers out of two of your cake layers)
  • Large piping bag & tip – I use this set of reusable large bags & tips more than almost any of my others! -
  • About 1 cup / 10-15 pieces depending on size Halloween candy
  • Three small piping bags (or ziplocks) or squeeze bottles for the cake drip
  • Cake leveler, cake turntable, large offset spatula, and pastry cutter/bench scraper - not all 100% necessary but incredibly helpful! (Here’s a link to the cake turntable I use) -https://www.amazon.com/gp/product/B072X63HQQ/ref=as_li_tl?ie=UTF8&tag=intensiveca04-20&camp=1789&creative=9325&linkCode=as2&creativeASIN=B072X63HQQ&linkId=35bbb2c3f1fbf0c4a4993cf5ce49788e
  • Cake drip mix - 6 oz white candy melts (I use the Wilton brand Bright White) +- 3 ¾ Tablespoons heavy whipping cream + 1-2 small drops each orange, green, and purple gel food color ((I used Americolor Electric green, Orange, and Electric purple)
  • Halloween sprinkle mix of your choice! (I used Sweetapolita’s ‘Witchful Thinking’)
Instructions
Cake
Note - this is a modified layer cake recipe from ChelSweets.com - I highly recommend checking out her site if you haven't before; it's amazing!! 
Preheat oven to 350°F. Line four 7 inch pans (for taller layers) or three 8-inch cake pans with parchment rounds, and /or grease with non-stick or baker’s floured cooking spray.
Mix together all dry ingredients (flour, baking powder, sugar, and salt) in a stand mixer with a paddle until fully combined.
Mix chunks of room-temperature butter slowly into the dry mix, on a low speed. Continue to mix until no large chunks of butter remain, and the mixture becomes crumbly.
Pour in eggs and mix on low until just incorporated. Mix in the buttermilk in two installments, on a low speed. Add in vanilla and oil, and mix at a low speed until fully incorporated. Scrape down the sides of the bowl with a spatula, then beat on medium speed for about 30 seconds.
Divide batter evenly between the prepared cake pans (I find a kitchen scale helpful for this part). This guarantees your layers will bake to be the same height.
Bake for 35-37 minutes if using 8-inch pans, or 37-38 minutes for 7-inch cake pans (or until a toothpick comes out clean). Allow cake layers to cool for 10-15 minutes on a wire cooling rack before removing from pans – it helps to run an offset spatula or knife around the perimeter of the pan first. Cool completely before frosting. Set in the fridge or freezer to accelerate the cooling process if desired.
Once the layers have fully cooled, the caramelized bits can be trimmed from the sides / top of the cake using a serrated knife if desired. Be sure the layers are completely cooled or chilled before trimming. If you try to trim the layers while they’re still warm, they will crumble apart.
To fill the center of your cake with candy, use a glass or medium-sized biscuit cutter to remove center from two of the three cake layers. 
Frosting / Decorating
Beat together softened cream cheese and butter; slowly add in powdered sugar alternating with cocoa powder and milk until frosting reaches desired consistency. Add vanilla, black gel color, and salt if needed and beat until well combined.
Once your cakes are cool, level them (if needed/desired). This can be done with a cake leveler or a large serrated knife and a ruler.
If you've cut centers out of two of your cake layers, those will be your bottom two layers. Place a smear of frosting on your cake circle (to keep the cake from sliding while you decorate it) and center your first cake layer in the center of the circle. Spread the layer with frosting.
Fill the empty centers of your cake with candy, add a layer of frosting over the second cake layer, and put the final layer on top!
Now you're ready to crumb-coat . If you're unfamiliar with crumb-coating, it's just what it sounds like – spreading a thin layer of frosting over the entire outside of the cake to keep crumbs out of your final layer. Once your crumb coat has set (this takes about 5-10 minutes in the fridge), add your final layer of frosting and smooth. I like to use an offset spatula and bench scraper for this part. Once your cake is covered, place it into the fridge or freezer to set the frosting.
This is a great time to make and color your ganache drip(s)!
(This recipe is very similar to my favorite white chocolate ganache recipe – you’re basically using candy melts instead of white chocolate to make a very similar drip ganache. I prefer this drip when I want bright vibrant colors that aren’t tinted yellow from the white chocolate!) Place heavy cream and candy melts in a microwave-safe bowl, and microwave on 50% power in 30-second intervals until smooth, stirring in between. Divide ganache into 3 bowls and color each third green, orange, and purple. I usually find a squeeze bottle or piping bag work the best for this ganache, but I’ve used a spoon for similar drips before.
When your candy melt mix has cooled to a moderate temperature – it should feel slightly warm and still be fairly liquid – transfer it to a squeeze bottle or piping or small ziplock bag. A spoon will work if you don’t have either of those; I’ve just found spoons to be a little bit more difficult to work with.
Slowly drizzle alternating colors of ganache around the upper edge of your cake, pausing every inch or so to let more fall in a drip down the side of the cake. Return cake to the fridge or freezer to set the drips.
Almost there!
Now you’re ready to decorate the top of the cake! Pipe a ring of frosting swirls around the edge of the cake, and decorate with sprinkles. I had the most purple candy melt ganache left over, so I poured it over the top of the cake and smoothed it with an offset spatula before adding more sprinkles on top – swirling the three colors would work as well!
The ‘Witchful Thinking’ mix comes with sprinkle ghosts and bats; I pulled out enough of each to decorate alternating drips with one or the other!
And you’re done! Cut in and watch the candy spill out – and enjoy!
Tips
  • Make this recipe? Let me know how it went by emailing sarah@intensivecakeunit.com - or find me on Pinterest or Instagram and tag @IntensiveCakeUnit in your photo!
Comments
  • Christina Christina on Oct 12, 2021

    Beautiful presentation!!

  • Dorothy Dorothy on Oct 31, 2023

    60 minutes prep time. 🤣🤣🤣 it took a couple minutes just to scroll thru the recipe and would probably take hours and hours to round up all the materials, not to mention Googling all the terms! I must be on another planet right now! It looks super cool, but I best stick to fine art creating. It’s much easier then this!!!

Next