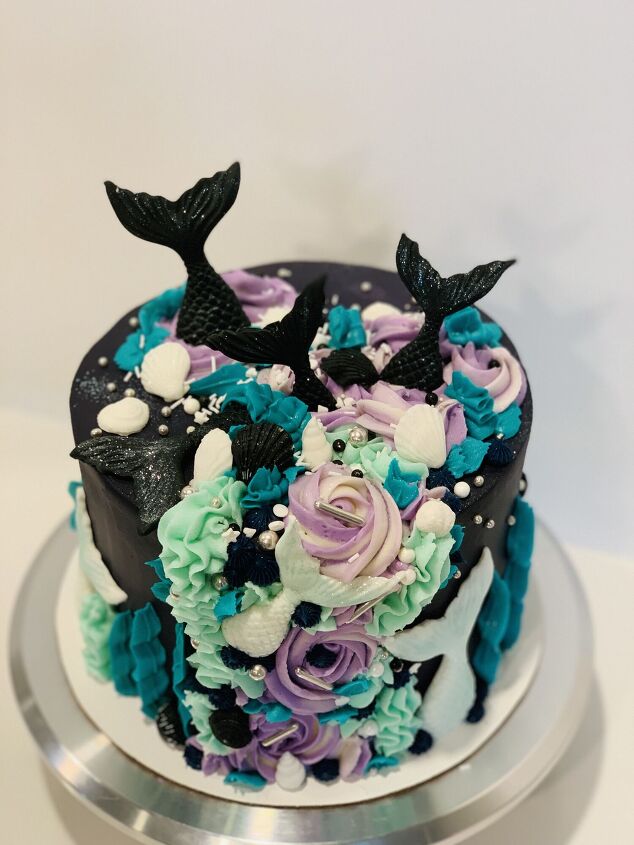
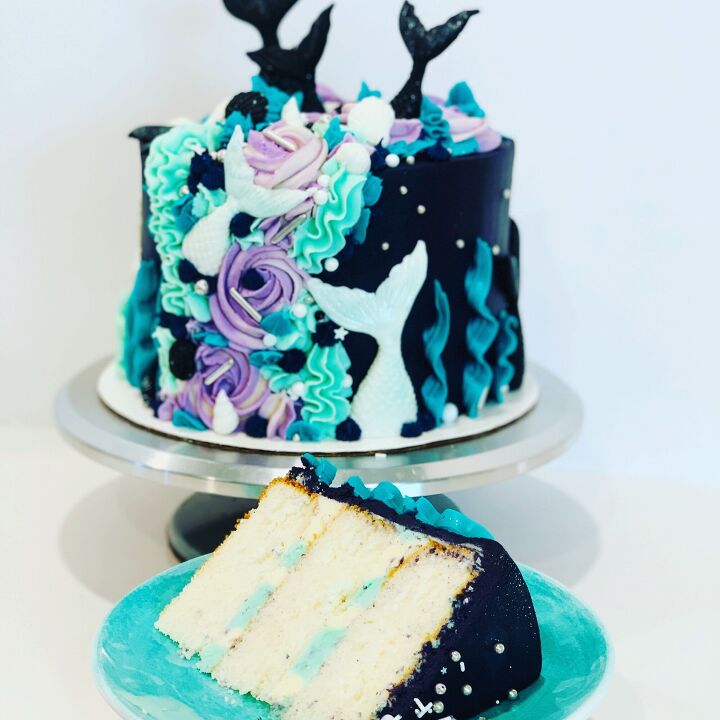
Mermaid Cake

Intensive Cake Unit
by Intensive Cake Unit
1 Cake
1 hr 20 min

Another in the trends on Instagram and Pinterest – the mermaid cake!


I’ve seen SO many cool mermaid cakes, but I spent literal months with a set of silicone mermaid tail and shell molds in my cake drawer before I pulled up the courage to make this cake – and I don’t know what I was so worried about! ;) I’m SO happy with how the cake turned out, and it wasn’t as hard as I thought it would be. I’ve seen Mermaid cakes with fondant and airbrush detailing that looked like they took HOURS, but this one came together with just my silicone molds plus some candy melts and piping tips!

I also used some supplies from my most recent ‘Fancy Sprinkles’ order – some teal Prism Powder (100% edible glitter) and their ‘Silver Bells’ white and silver sprinkle mix!

If you want to make a similar cake – recipes and links to the supplies I used are below!

Recipe details
  • 1  Cake
  • Prep time: 45 Minutes Cook time: 35 Minutes Total time: 1 hr 20 min
Show Nutrition Info
Hide Nutrition Info
Ingredients
Cake
  • 3 1/4 cup all-purpose flour
  • 3 cup granulated sugar
  • 2 1/2 teaspoon baking powder
  • 1 teaspoon salt
  • 1 cup unsalted butter (or 2 sticks) room temperature
  • 2 teaspoons clear vanilla extract
  • 5 eggs 
  • 1 1/2 cups buttermilk, room temperature (or buttermilk powder with water is an option if you can’t find liquid buttermilk at your grocery store!)
  • 1/8 cup (28 grams) vegetable oil
Frosting + Decorations
  • 8 oz (one package) cream cheese, softened
  • 16 Tablespoons (two sticks) butter, softened
  • 6-7 c powdered sugar
  • 2-4 Tablespoons milk
  • 1 T clear vanilla extract
  • 1/4 t. salt (if using unsalted butter)
  • Save and add later – several large drops purple, black, and teal gel food color (I used Americolor)!
  • - 1 8- or 10 -inch cardboard cake circle (I prefer Wilton’s center-punched circles)
  • - Cake leveler, cake turntable, large offset spatula, and pastry cutter/bench scraper - not all 100% necessary but incredibly helpful! (Here’s a link to the cake turntable I use)
  • - Silicone Mermaid molds – the set I used is out of stock as I write this – but here’s a very similar and actually less expensive set!
  • - Black and white candy melts – I found candy melts to work much more easily with these molds than the fondant I tried at first. I also used some of Fancy Sprinkles teal Prism Powder (edible glitter), but this is optional!
  • - Sprinkle mix of your choice – I used Fancy Sprinkles ‘Silver Bells’ but pearlized sprinkles (these are available online) and small sugar pearls (I used white and pink) would work great too!
  • - this is optional, but I added a bit of white sparkling sugar to the cake top for a bit of sparkle and texture
  • - Large piping bag & tip – I use this set of reusable large bags & tips more than almost any of my others!
  • - Small piping bag & tip(s) – this set has been one of my favorites!
Instructions
Cake
Preheat oven to 350°F. Line four 7 inch pans (for taller layers) or three 8-inch cake pans with parchment rounds, and /or grease with non-stick or baker’s floured cooking spray.
Mix together all dry ingredients (flour, baking powder, sugar, and salt) in a stand mixer with a paddle until fully combined.
Mix chunks of room-temperature butter slowly into the dry mix, on a low speed. Continue to mix until no large chunks of butter remain, and the mixture becomes crumbly.
Pour in eggs and mix on low until just incorporated. Mix in the buttermilk in two installments, on a low speed. Add in vanilla and oil, and mix at a low speed until fully incorporated. Scrape down the sides of the bowl with a spatula, then beat on medium speed for about 30 seconds.
Divide batter evenly between the prepared cake pans (I find a kitchen scale helpful for this part). This guarantees your layers will bake to be the same height.
Bake for 35-37 minutes if using 8-inch pans, or 37-38 minutes for 7-inch cake pans (or until a toothpick comes out clean). Allow cake layers to cool for 10-15 minutes on a wire cooling rack before removing from pans – it helps to run an offset spatula or knife around the perimeter of the pan first. Cool completely before frosting. Set in the fridge or freezer to accelerate the cooling process if desired.
Once the layers have fully cooled, the caramelized bits can be trimmed from the sides / top of the cake using a serrated knife if desired. Be sure the layers are completely cooled or chilled before trimming. If you try to trim the layers while they’re still warm, they will crumble apart.
This is a great time to make your frosting!
Frosting + Decorations
Beat together softened cream cheese and butter; slowly add in powdered sugar alternating with milk until frosting reaches desired consistency. Add vanilla and salt if needed and beat until well combined. Remove about ½ – ¾ cup of frosting from the bowl into each of 3 additional bowls and set aside – you’ll use these to color and decorate later!
Once your cakes are cool, level them (if needed/desired). This can be done with a cake leveler or a large serrated knife and a ruler.
Place a smear of frosting on your cake circle (to keep the cake from sliding while you decorate it) and center your first cake layer in the center of the circle. This is optional, but I colored a bit of frosting teal at this stage and piped alternating colors onto the cake layer to make ‘stripes’ when the cake was cut – up to you! You could also just spread the first layer with frosting. Add your next cake layer on top, and repeat the process with your remaining cake layers. Now you're ready to crumb-coat. If you're unfamiliar with crumb-coating, it's just what it sounds like – spreading a thin layer of frosting over the entire outside of the cake to keep crumbs out of your final layer. Once your crumb coat has set (this takes about 5-10 minutes in the fridge), add your final layer of frosting and smooth. I like to use an offset spatula and bench scraper for this part, and I made the frosting layer thin enough to let the cake layers show through a bit for a ‘semi-naked’ cake style. Once your cake is covered, place it into the fridge or freezer to set the frosting.
This is a great time to make your decorations and color your frostings! Spread melted white and black candy melts into the molds and then un-mold them once they set – you can make un-molding a little easier by refrigerating them for a few minutes. Sprinkle or brush with a bit of prism powder for some extra sparkle, if desired.
I colored one bowl light purple (and didn’t mix it in completely so there was a bit of white left), the next bowl light teal, and the last bowl dark teal. The frosting left in the bowl I colored with several large drops of Americolor purple and a couple large drops of black to make a super-deep purple.
Once your crumb coat has set (this takes about 5-10 minutes in the fridge), add your final layer of frosting and smooth. I like to use an offset spatula and bench scraper for this part. Once your cake is covered, place it into the fridge or freezer to set the frosting.
All the tips I used for this cake are in the sets linked above – they don’t have numbers I could find on the tips, but I used a small notched oblong tip to make the ‘seaweed’ up the sides of the cake, the large open star to make the swirls up the sides and top of the cake, and a small open star for the light teal ‘squiggles.’ Make sure your frosting is thick enough – some of my ‘seaweed’ didn’t hold its shape until I thickened the frosting with a bit of powdered sugar.
I added a few mermaid tails around the sides of the cake, and then a few to the center of the swirls on the top of the cake. Add some candy melt seashells to the sides and top, and some sprinkles wherever you think they fit best! I thought the small silver pearls looked neat as ‘bubbles’ on the sides of the cake, and added a few of the oblong silver sprinkles to the piping on the front of the cake. Annnnd you’re done! Cut in and enjoy!
Tips
  • Make this recipe? Let me know how it went - or find me on Pinterest or on Instagram and tag @IntensiveCakeUnit in your photo!
Intensive Cake Unit
Want more details about this and other recipes? Check out more here!
Go
Comments
Next