American Flag Cake

Sally
by Sally
1 Cake
1 hr 45 min

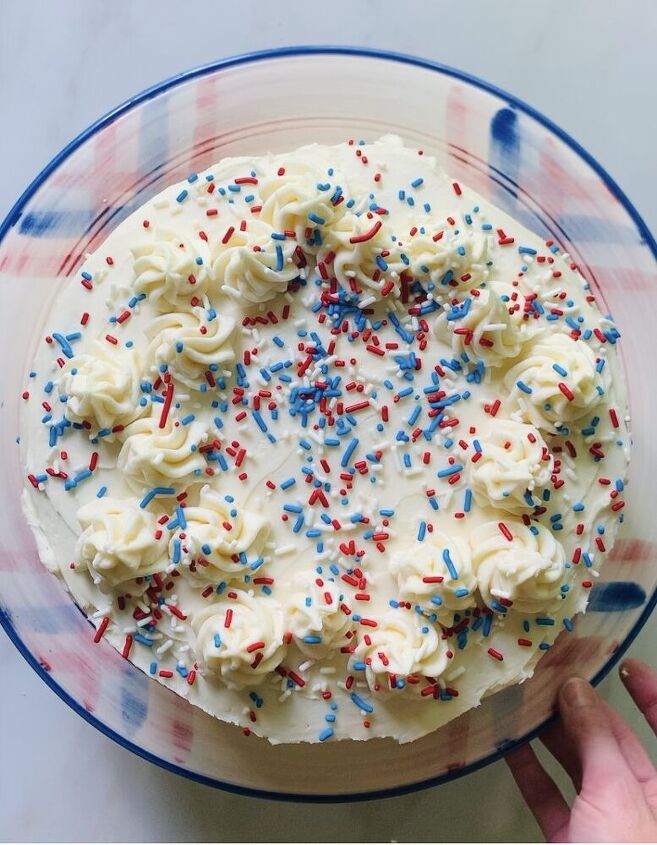
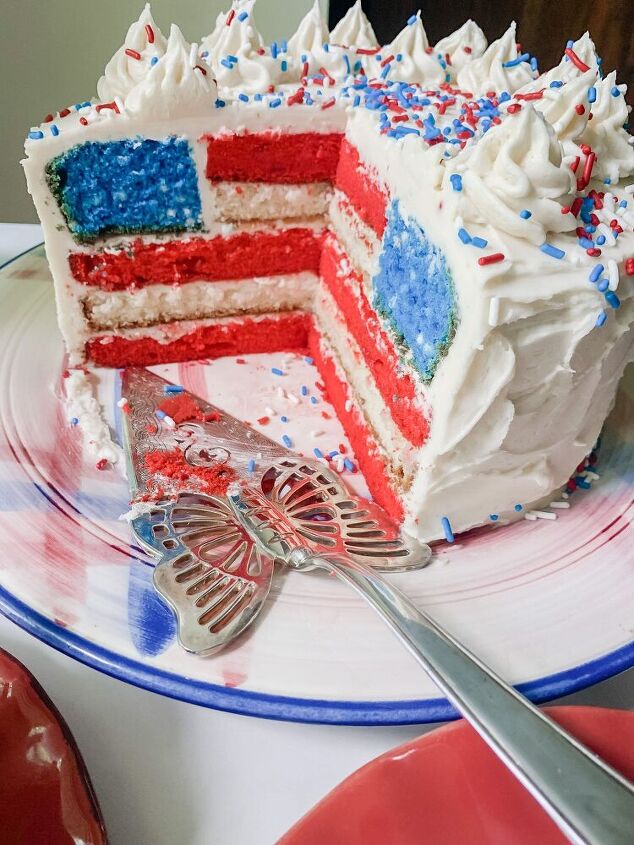
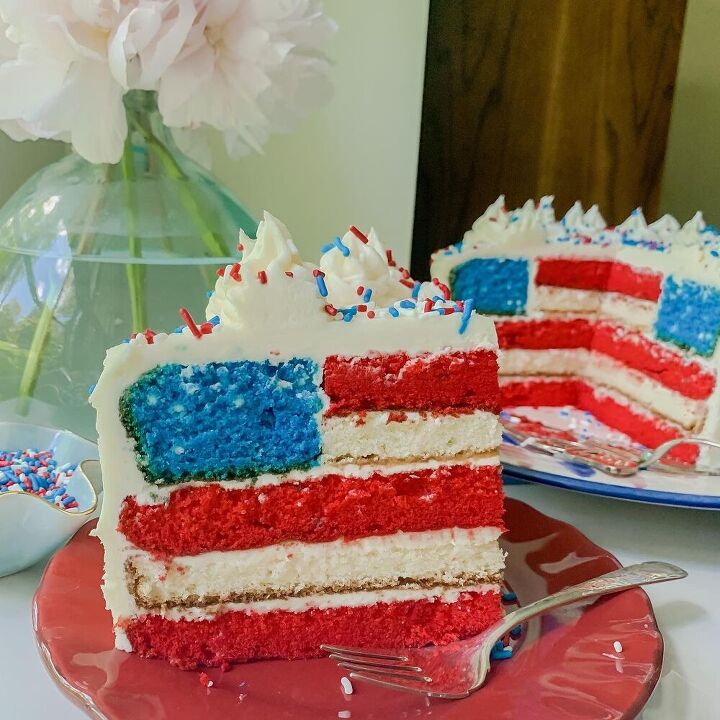
Recently, I decided to take on the challenge of making an American Flag Layer Cake. Why not? July 4th is around the corner, and I enjoy baking holiday themed desserts. This cake is comprised of multiple layers and a delicious homemade buttercream frosting.

To make my layers, I used a strawberry boxed cake mix and a white boxed cake mix. If you decide to bake an American Flag Cake you’ll need to bake a total of 4 cake layers in order to build the cake. You’ll need two red cake layers, one white cake layer, and one blue cake layer. I made the red cake layers using the strawberry cake mix. The white and blue layers were made with a white cake mix. You will have leftover cake layers and scraps that will need to be saved for another use. Consider making a small trifle with your cake scraps.

I have a standard size oven and only three 9” cake pans, so I baked my strawberry cake layers first. Then I washed my cake pans and made my white cake layers (one of which is dyed blue). I like to prepare my cake layers and buttercream frosting a day before I plan build my layer cake. After my cake layers are prepared and cooled, I wrap them in plastic wrap and refrigerate them. I often make my frosting the same day that I prepare my cakes. I keep the buttercream frosting in an airtight container until it’s time to build the cake.

Some prep work is required with the baked cake layers in order to achieve the American Flag design once it is time to build the layer cake.

Read this article for more of my cake baking and decorating tips and tricks.

I always like to buy boxed cake mixes when they are BOGO at Publix for when the cake baking mood strikes. If you’re feeling especially Patriotic and you love to bake, this cake recipe is for you. I hope you’ll try making it. Wishing y’all a wonderful upcoming holiday ahead!

-XOXO-

Sally

Recipe details
  • 1  Cake
  • Prep time: 60 Minutes Cook time: 45 Minutes Total time: 1 hr 45 min
Show Nutrition Info
Hide Nutrition Info
Ingredients
For the red cake layers
  • 1 box strawberry cake mix
  • 1 C milk
  • 3 large eggs
  • 1/3 C melted butter
  • Red food coloring gel
For the white and blue cake layers
  • 1 box white cake mix
  • 1 C milk
  • 3 large eggs
  • ½ C melted butter
  • Blue food coloring gel
  • White Cupcake Pearls
For the buttercream frosting
  • 2 C butter, softened (4 sticks)
  • 32oz of Confectioner’s sugar, sifted
  • 3T vanilla extract
  • 2-3T of milk or heavy cream
Tools
  • 2 to 4, 8” or 9” cake pans
  • Parchment paper cut to fit the bottom of your cake pans
  • Bakers spray (such as Baker’s Joy)
  • 4” round biscuit cutter
  • Serrated knife
Instructions
Instructions to prepare your cake layers and buttercream frosting
To make this cake you will need to prepare your box cake mixes ALMOST according to package directions. A few simple ingredient swaps make boxed cake mixes a little moister. I have a traditional size oven at home, so I will bake my cake layers one box mix at a time, starting with my strawberry layers.
Start by preheating your oven to 350F and preparing your cake pans. Use a pencil to trace a circle around the bottom of your cake pans onto parchment paper. Cut the parchment paper circles out with scissors. Lightly spray the bottom of your cake pans with Baker’s spray (such as Baker’s Joy). Place one parchment paper circle onto the bottom of each pan. Generously spray each cake pan with Baker’s spray.
Combine strawberry cake mix, 1 C milk, 1/3 C melted butter, 3 eggs, and several drops of red food coloring gel in a large bowl. Using a hand held mixer or a stand mixer fitted with a paddle attachment, beat all ingredients together over medium speed until well combined.
Pour equal amounts of strawberry cake batter into your prepared cake pans. Bake cakes for 23-29 minutes or until a toothpick inserted into the center of the cake comes out clean. Remove cakes from the oven and cool on wire racks for 15 minutes. Turn cakes out onto wire racks to cool completely. Once cake layers are completely cool, wrap them in plastic wrap and refrigerate for at least 4 hours or up to 24 hours.
While the strawberry cakes are baking, prepare your white cake mix.
Combine white cake mix, 1C milk, ½ C melted butter, and 3 eggs in a large bowl. Using a hand held mixer or a stand mixer fitted with a paddle attachment, beat all ingredients together over medium speed until well combined. Pour half of the white cake batter into prepared cake pan. Add blue food coloring gel and white cupcake gems to the remaining white cake batter in the bowl. Stir the cake batter until the food coloring gel is completely blended into batter. Pour remaining batter into your prepared cake pan.
Bake white cakes for 23-29 minutes or until a toothpick inserted into the center comes out clean. Remove cakes from the oven and allow to cool on wire racks for 15 minutes before turning out to cool completely on wire racks. Once the cake layers are completely cool, wrap them in plastic wrap and refrigerate for at least 4 hours or up to 24 hours.
To prepare your buttercream, use the paddle attachment of a stand mixer or hand mixer or a large spoon, beat your softened butter in a bowl until smooth. Slowly add in sifted confectioners sugar by the spoonful. Finally, add in your vanilla and heavy whipping cream and beat or mix until the frosting is smooth. For a thinner icing consistency, add in additional heavy whipping cream or milk one teaspoon at a time until desired consistency is reached. An optional step is to use food coloring gels to tint your icing to your color of choice. Store buttercream frosting in an airtight container until you are ready to build your cake.
Instructions on how to assemble your cake
For the red layers:
Start by using a serrated knife to split both of your red cake layers in half, crosswise. Use a 4” biscuit cutter to cut a 4” round out of one of the halved layers.
Save the layer with a circle cut out of it, and one other half layer for a separate use.
For the white layer:
Use a serrated knife to split the white layer in half crosswise. Use a 4”round biscuit cutter to cut a 4”round out of one of the halved layers.
Save the halved layer with the circle cut out of it for a separate use.
For the blue layer:
This layer does not get split. Use a 4” round biscuit cutter to cut a circle out of the center of this layer.
Save the circle cut out for another use. 
Once the layers are cut and you have your 4″round cake cutouts in white and red, the cake is ready to be built. Follow these steps to build the American Flag Cake:
1. Start by placing a halved red layer on a plate. Frost the top of this layer.
2. Place a halved white layer on top of the frosted red layer. Frost the top of the white layer.
3. Place another red layer on top of the frosted white layer. Frost the top of the red layer.
4. Place the blue layer with a 4” circle cut out of the center on top of the frosted red layer. Frost the top and insides of the blue layer.
5. Place the white 4”circle inside the center of the blue layer. Frost the top of the white circle.
6. Finally, place the red 4” circle on top of the white circle in the center of the blue layer. Apply a crumb coat to the top and sides of the cake. Refrigerate for 15 minutes. Remove cake from the refrigerator and frost it completely with the remaining buttercream. An optional step is to use a piping bag fitted with a star tip to add detail to the cake. Top with patriotic sprinles.
Recipe Notes: Use toothpicks around the side of your cake layers to split them in half evenly. Refrigerating your cake layers prior to splitting them will also help make this step easier.
 You will have half of a red cake layer, half a red cake layer with a circle cut out of it, half of a white cake layer with a circle cut out of it, and a blue 4” round cutout leftover that are NOT used to build the cake.
Sally
Want more details about this and other recipes? Check out more here!
Go
Comments
Next