Zucchini Relish

78 ounces
1 hr 15 min

Do you have trouble using or sharing all of the zucchini you grow in your garden? Or do you love relish on your hamburgers, hotdogs, brats and sandwiches? Either way you will love this recipe!

This Zucchini Relish recipe was passed down to me from my father-in-law. It's a family favorite. When I first looked at the recipe, I was intimidated. But, it was much easier than I thought it would be.

We now make two batches every year and that lasts us until we have zucchini growing again the next year.

There are more recipes using zucchini on our family recipe blog-breads, dinners and sides. We'd love to share them with you. Check them out with this link- Zucchini Recipes. icon

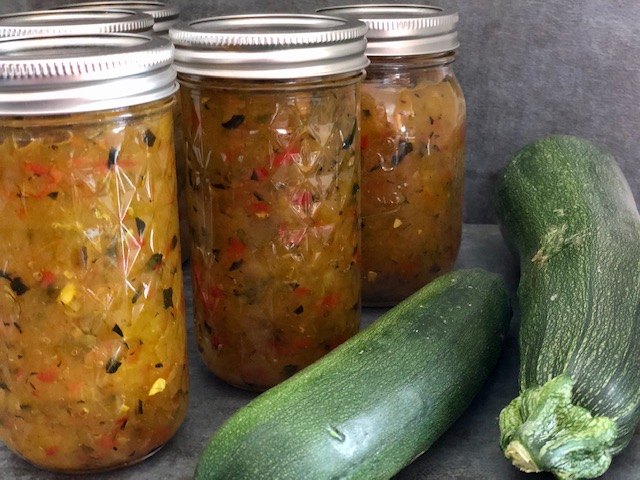
Bottled Zucchini Relish

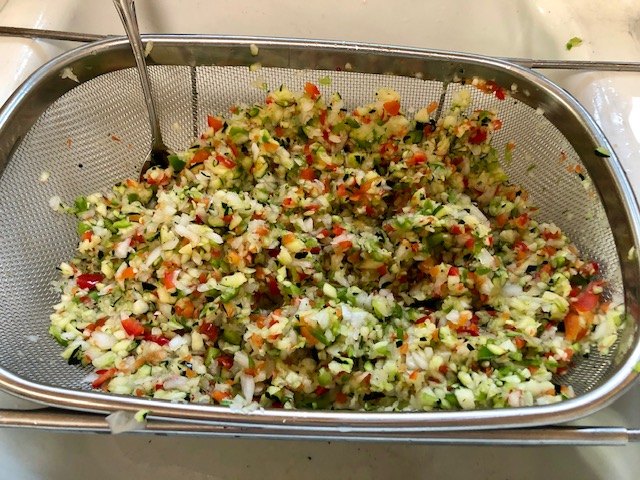
Rinse and drain well.

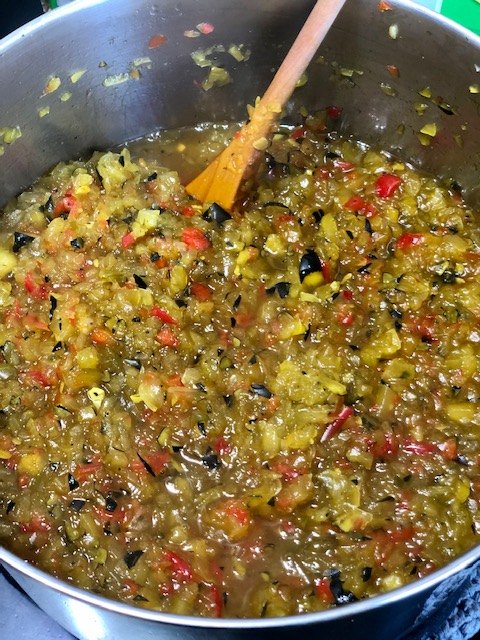
Nearly ready to bottle.

Recipe details
  • 78  ounces
  • Prep time: 40 Minutes Cook time: 35 Minutes Total time: 1 hr 15 min
Show Nutrition Info
Hide Nutrition Info
Ingredients

  • 10 cups zucchini ground
  • 4 cups white onion ground
  • 2 large sweet red bell peppers ground
  • 2 large green bell peppers ground
  • 1/3 cup pickling salt
  • 2 ½ cups white vinegar
  • 1 tbsp corn starch
  • 4 ½ cups sugar
  • ½ tsp pepper
  • 1 tsp celery seed
  • 1 tsp turmeric
  • 1 tsp curry powder
Bottling Supplies:
  • glass bottles enough for about 78 ounces
  • sealing lids and rings as shown above
Instructions

Cut the ends off of the zucchini, cut them in half, or quarters. Cut out and discard the seeds. Do not peel the zucchini-this will give it color. Cut zucchini into pieces that will fit into your grinder.
Peel the onion and cut it into pieces that will fit into the grinder.
Cut the stems off and remove the seeds from all four peppers. Cut them into chunks.
Grind the zucchini, onion and peppers.
Place all of the vegetables into a bowl or pan. Mix the pickling salt into the vegetable mixture and cover. Refrigerate overnight.
The next day, place vegetables into a fine metal strainer and rinse well with cold water. Drain well.
Place drained vegetable mixture into a large pot and add remaining ingredients. Bring ingredients to a boil, stirring frequently. This will burn easily.
Once the mixture starts to boil, stir continually for 20 to 30 minutes while boiling and thickening. Adjust heat as needed to keep the mixture simmering but not burning-keep stirring.
After the 20-30 minutes have passed and the mixure has thickened, remove it from the heat.
Place hot water into two other smaller pots. Place two or three of the sealing lids in the smallest pot-they need to boil and become hot when placed on the hot bottles.
Fill two or three bottles with the relish (fill enough bottles to fit into the pan with the water that you will heat the bottles in-my pan fits 3).
Place these bottles in the pot and allow the water to boil to heat up the bottles.
When the bottles are hot and the sealing lids are hot, remove one bottle from the boiling water with a bottle lifter (for canning) and place on a surface that can take the heat-I place a (folded in half) clean bath towel on the kitchen counter next to the stove). Wipe the rim of the bottle off with a clean wet dish cloth and remove a sealing lid from the boiling water with tongs. Place this lid onto the hot bottle. Place the ring onto the bottle, twist it on tight. Use a kitchen towel to tighten-bottles should be hot.
Once you have the lid on tightly, Place it where it will not be bothered-I place it at the back of the counter on the towel.
Repeat with the other bottles that are hot. Place another towel over the top of the finished bottles.
Then, fill more bottles, heat the filled bottles, heat more sealing lids, wipe the rim of the bottle and seal the rest-just repeat the process until you have used all of the relish. If you have any leftover that is not enough for another bottle, I place this in a tupperware in the refrigerator to use first.
Now, all of the relish is either sealed or in a tupperware in the refrigerator. Allow time for the bottles to cool under the towel. You should begin to hear a pop for each bottle. This means the bottle has sealed successfully. *Use Ball or Kerr brand sealing lids.
You will notice, before you heat the lids and before they seal, there is a slight convex bump in the middle of the sealing lid. When you seal a bottle and hear the pop, that little bump will turn concave. That pop and the concave center of the sealing lid means it has sealed.
When the bottles have sealed and cooled store in a cool dry place.
If the lids do not seal, you have to repeat the sealing process by heating up the bottles and using new hot sealing lids.
Tips
  • This is possible to make alone but, it's way more fun to make with family or a friend, and it's helpful too.
Sweeter With Sugar
Want more details about this and other recipes? Check out more here!
Go
Comments
Next