


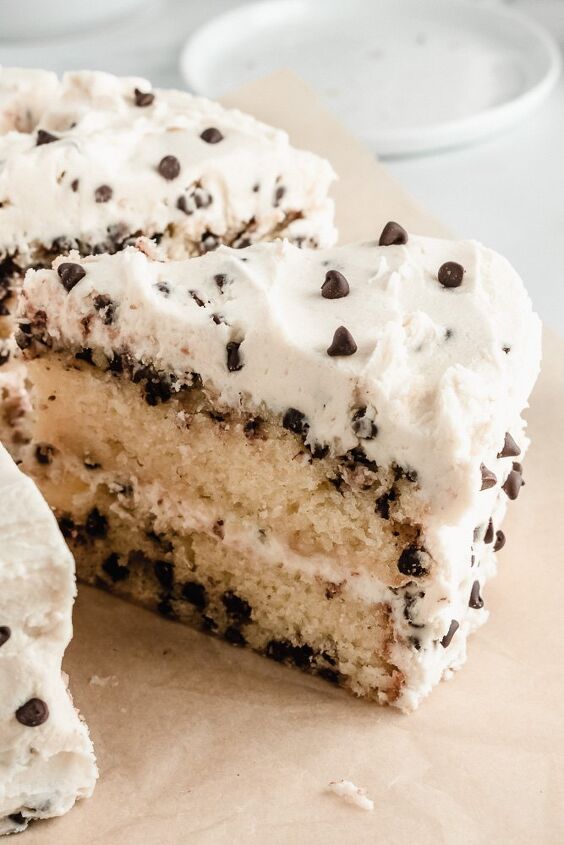
Chocolate Chip Layer Cake With Brown Sugar Buttercream

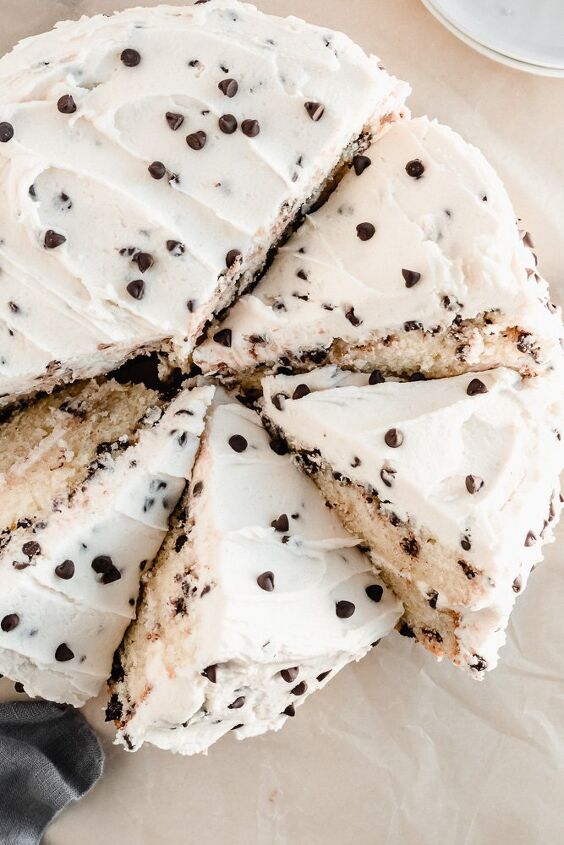
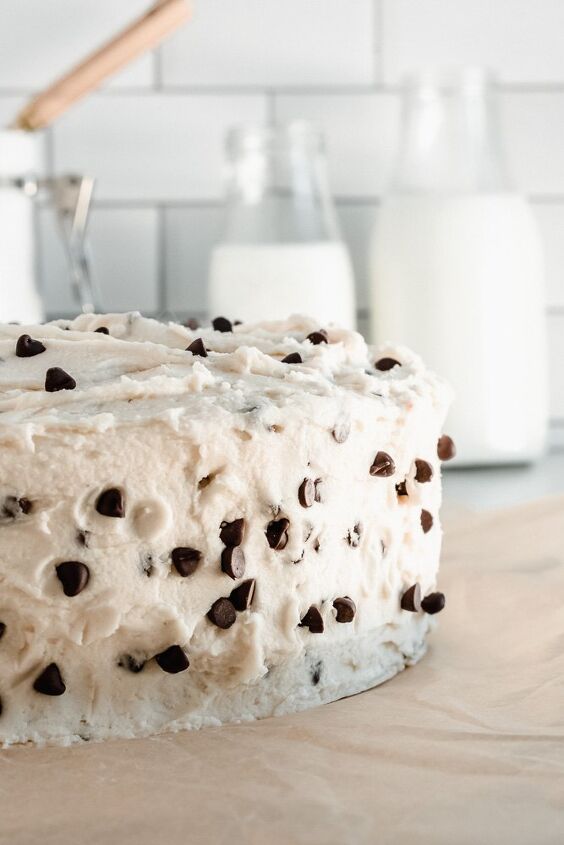
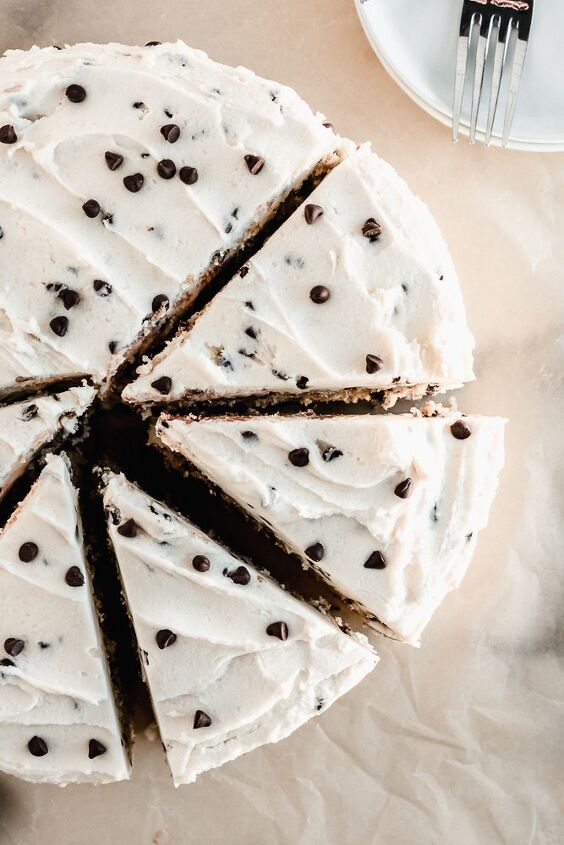
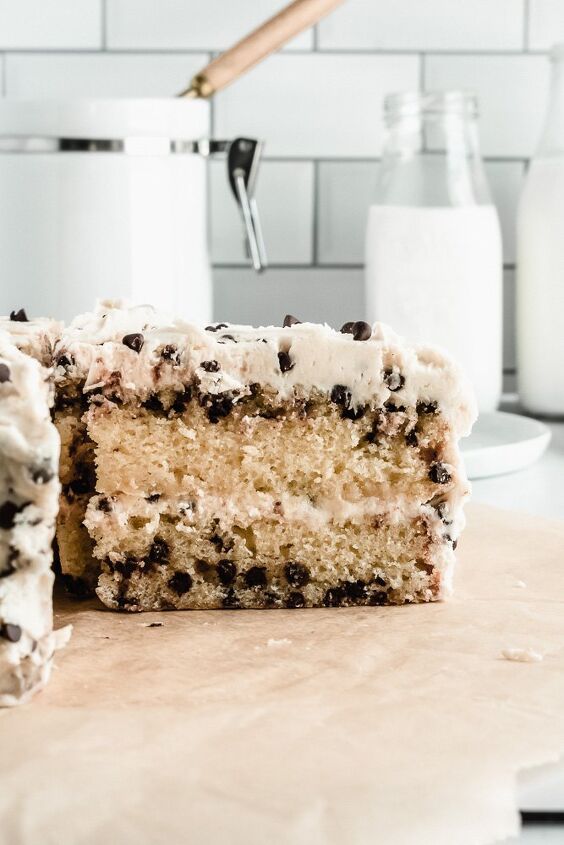
This chocolate chip layer cake is what a cookie lover’s dreams are made of! With two layers of vanilla cake loaded with mini chocolate chips and a brown sugar buttercream frosting that tastes just like cookie dough, the cookie AND cake lover in you will be more than satisfied! I have tips on how to make a delicious brown sugar frosting that is smooth and full of flavor. Add in a bit of vanilla and some mini chocolate chips, and you have yourself one yummy frosting that you’ll certainly be tempted to eat by the spoonful. You’re definitely going to want to make this cake, friends!
This post contains affiliate links. This means I may earn a commission should you choose to make a purchase using my link. It’s okay – I love and use all of these products, and you will too!
If you’re a big fan of chocolate chip cookies AND cake, then this is the dessert for you. Two moist and fluffy vanilla cake layers loaded with mini chocolate chips and a hefty dose of brown sugar buttercream make this cake taste just like chocolate chip cookie dough! Read on for how to make this yummy and easy layer cake.
Tips for the Best Chocolate Chip Layer Cake
This chocolate chip layer cake is super duper easy to make! You don’t need a mixer to whip up the cake layers, and making them is quick and simple! Here are a few helpful tips to make this baking experience even easier!
Prep Your Cake Pans – For this recipe, you will need two 8-inch round cake pans. I always prep mine with baking spray that contains flour, like Pam for Baking. It makes getting the cakes out so much easier and it is super quick and easy!
I also like to cut out two parchment paper circles to put on the bottom of my pans too – it makes removal of the cakes even easier. Simply trace your cake pans on two pieces of parchment paper, cut out the circles, and place them in your prepared cake pans! Be sure to spray additional baking spray on top of the parchment paper rounds as well.
Mix Your Wet And Dry Ingredients In Two Bowls – Mix up your dry ingredients in a large bowl and your wet ingredients in a separate medium-sized bowl. When you mix your dry and wet ingredients separately first before incorporating them together, it helps keep you from overmixing your batter (which can lead to a less than fluffy cake)!
Bake Cake Layers and Cool Completely – You’ll want to be sure that your chocolate chip cake layers are completely cooled before frosting! I always cool my cake layers in their pans for 10 minutes and then transfer them to a wire rack to cool completely!
How to Make Brown Sugar Buttercream
In my opinion, the real star of this chocolate chip layer cake is the frosting on top – brown sugar buttercream! It tastes JUST like chocolate chip cookie dough. Especially once you add in the final touch – mini chocolate chips!
Brown Sugar Buttercream
Incorporating brown sugar directly into your frosting ingredients can make the buttercream feel a bit grainy from the texture of the brown sugar. To avoid this, you’ll want to make a simple brown sugar syrup. It is super easy and doesn’t take long!
Here’s what you’ll need to do:
- In a medium saucepan over medium heat, combine 1/2 cup brown sugar and 1 1/2 tablespoons of water. Stir to combine.
- Bring the mixture to a soft boil and let cook for about 5 minutes to thicken. Remove from heat and let cool for 10 – 20 minutes. It won’t be super hot but it won’t quite be room temperature!
After this, you’ll simply incorporate the brown sugar syrup into your butter and powdered sugar mixture! See? Pretty simple! And trust me. It is worth the extra step for creamy and smooth buttercream!

High Altitude Adjustments for Cakes
For reference, I live at 5,800 feet. These adjustments would likely give you the result that you are looking for if you live within a few hundred feet of where I am at. But high altitude baking can be a lot of trial and error! This should give you a starting point to go off of to experiment with your own ingredients at whatever elevation you live at! I would also recommend checking out this guide here.
High Altitude Adjustments for Mocha Layer Cake
- Flour – increase by 2 tbsp. Additional flour helps to strengthen the structure of the baked good so that it will rise correctly. At 3,500 feet, add 1 more tbsp. of flour per recipe. For each additional 1,500 feet, add one more tablespoon.
- Granulated Sugar – decrease by 2 tbsp. This should hold true at most high elevations. Always decrease your sugars by 1 tbsp. per cup.
- Baking Powder – decrease to 1 tsp. You can see this table on King Arthur’s website for how to adjust leavening agents for higher elevations (scroll down a ways to the “Leavening” section on their site). For my elevation, I typically cut all leavening agents in half. This allows for the right chemical reactions to happen between the other ingredients for the perfect rise. If there is too much leavening within the batter, not all of it gets used up (not all of it reacts with the other ingredients). You are then left over with a soapy bitter-tasting baked good due to the excess baking soda or baking powder in the batter.
- Eggs – use 3 eggs instead of 2. This will keep the baked good from drying out at a higher baking temperature and evaporation rate. If I am baking a cake or cupcakes, I like to add one more egg to increase the liquids in the recipe. This should hold true at most higher elevations, but experiment with it, of course!
- Increase oven temperature to 360° F. Since rising and evaporation proceed more quickly at higher elevations, you will want to use a higher baking temperature to set the structure of the baked goods so that they don’t sink in the middle and dry out on the edges. I recommend starting with increasing the baking temperature stated in the recipe by 15° F and go up from there in small increments (all the way up to 25° F increase if needed).
- Decrease baking time by 5 or more minutes. You’ll want to decrease the baking time because you will be baking at a higher temperature. You don’t want your cake to burn! I usually decrease by 5-8 minutes per 30 minutes of baking time and adjust from there. Be sure to keep a close eye on your dessert in the oven while you are experimenting with time and baking temps.
I hope that you enjoy this easy little chocolate chip layer cake! If you make this cake or any of my other fun cake recipes above, be sure to tag me in your photos on Instagram or use in your photos! I love to see what you are baking.
Chocolate Chip Layer Cake With Brown Sugar Buttercream
Recipe details
- 1 8-inch cake
- Prep time: 20 Minutes Cook time: 40 Minutes Total time: 1 hr


Comments
Share your thoughts, or ask a question!
I only have 9" layer cake pans. Can this cake be prepared in a 9" x 13" pan?