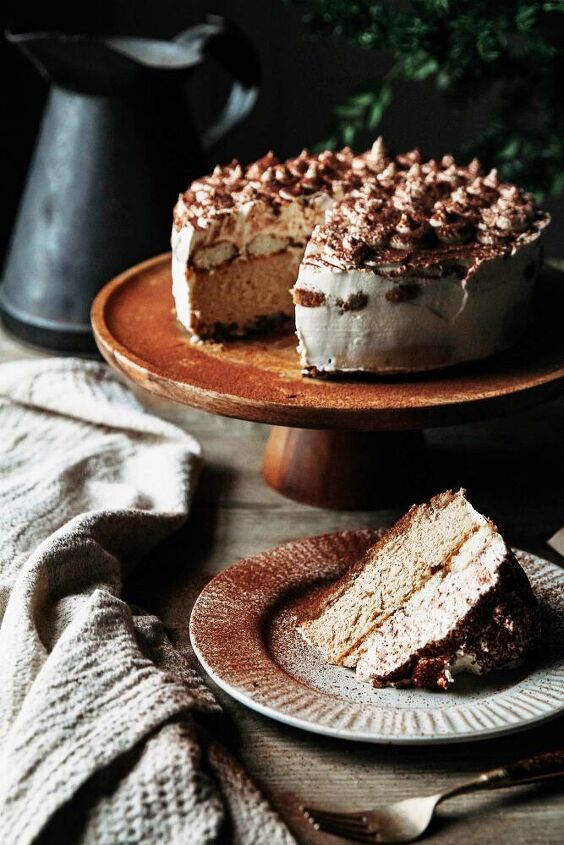
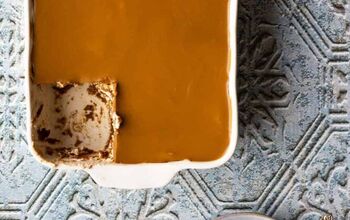
Tiramisu Cheesecake

12 servings
2 hr 10 min

Italian-inspired creamy tiramisu cheesecake is easy to make at home with this step-by-step recipe. It's hands-down the best cheesecake there is!


This coffee-flavored tiramisu dessert in cheesecake form is perfect for holidays, special occasions, or just because!

If you're like me and indecisive, blending two of the favorite desserts into one is a logical choice. Double the love!


This tiramisu cheesecake, meaning "pick me up" or "cheer me up," lives up to its name.


Cheesecakes are my one weakness, so it's not a surprise that I mashed up other desserts with it.


Some of my favorites are  brownie pumpkin cheesecake, and  baklava cheesecake.


This fusion gained fame when the Cheesecake Factory's Tiramisu Cheesecake hit their menu.

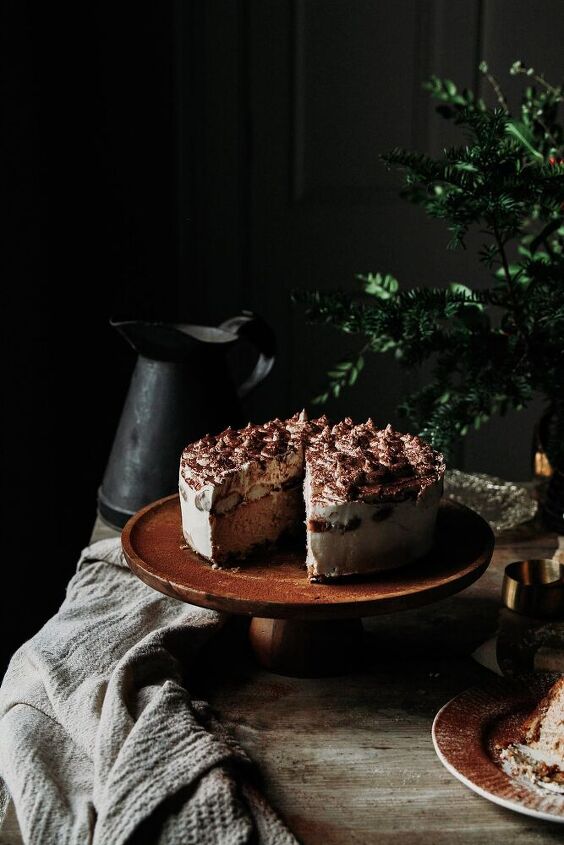
This tiramisu cheesecake is best made a day ahead of time, so it's a great option if you are planning to serve it as part of a bigger feast.


This is a great dessert option if you are planning an occasion meal. It's a great alternative Christmas dessert that everyone will love!


The most creamy baked tiramisu cheesecake with hints of chocolate and coffee, what's not to love?!


Recipe details
  • 12  servings
  • Prep time: 1 Hours Cook time: 70 Minutes Total time: 2 hr 10 min
Show Nutrition Info
Hide Nutrition Info
Ingredients
For the Coffee Mixture (for dipping ladyfingers):
  • 1/2 cup hot water
  • 2 tablespoons sugar
  • 1 tablespoon instant espresso or strong coffee
  • 2 tablespoons coffee-flavored liqueur
For the Cheesecake:
  • 1 tablespoon hot water
  • 1 tablespoon instant espresso or strong coffee
  • 2/3 cup heavy whipping cream
  • 24 ladyfingers, divided
  • 3 (8 oz.) packages full-fat cream cheese, at room temperature
  • 1/4 cup cornstarch (cornflour in some countries)
  • 1 1/3 cups sugar
  • 2 large eggs
  • 1 tablespoon pure vanilla extract
For the Tiramisu:
  • 1 1/2 cups heavy whipping cream cold
  • 2 tablespoons sugar
  • 1 tablespoon pure vanilla extract
  • 1 8 oz. carton Mascarpone cheese
Instructions
Coffee Mixture:
Whisk ½ cup hot water and 1 tbsp espresso in a small saucepan until dissolved. Add 2 tbsp sugar and 2 tbsp coffee liqueur; bring to a boil. Reduce the heat to medium and let simmer for 3 minutes, uncovered, stirring a few times.
Cheesecake:
Stir 1 tbsp hot water and 1 tbsp instant coffee together in a small cup until dissolved. Let cool. In a small bowl, stir this coffee with ⅔ cup heavy whipping cream. Set aside.
Preheat oven to 350 degrees Fahrenheit.
Generously butter the bottom and sides of a 9-inch springform pan. Dip 12 ladyfinger cookies into the coffee and liqueur mixture just long enough to get them wet, do not soak them! Arrange the ladyfingers on the bottom of the pan (break or cut the last one to fit and fill the gaps). Wrap the outside of the pan with aluminum foil, covering the bottom and extending up the sides (see recipe notes for more tips).
Next, in a large bowl, with an electric mixer, beat one package of the cream cheese, ⅓ cup of the sugar, and ¼ cup cornstarch on low speed until smooth. Scrape the sides of the bowl and beaters with a spatula as needed.
Blend in remaining cheese, one package at a time. Add the eggs, one at a time, and continue to beat slowly until combined.
Beat in the remaining 1 cup sugar and 1 tbsp vanilla extract, and beat on medium speed just until light and fluffy. Slowly beat in the heavy cream mixture until blended; take care not to over whip!
Spoon the batter into a springform pan. Place the pan in a large shallow pan containing hot water about halfway up the springform pan. Bake the cheesecake for about 1 hour and 10 minutes, or until the center barely jiggles when the pan is gently shaken.
Remove the cake from the water bath and let cool in the pan, on a wire rack, for 2 hours. Cover with plastic wrap and refrigerate until completely cold, preferably overnight or at least 4 hours.
Top the cold cheesecake, still in the pan, with a layer of remaining 12 ladyfingers dipped in the coffee mixture. Transfer the cake to the freezer until completely frozen, 3-4 hours or overnight.
Tiramisu:
In a medium-size bowl, whip the 1 ½ cups cold heavy cream with the mixer on high speed until it thickens and soft peaks begin to form. With the mixer still running, add 2 tbsp sugar and beat until the stiff peaks form. Do not over mix! Beat in 1 tbsp vanilla.
Gently fold in the 8 oz. mascarpone with a rubber spatula.
Assemble:
Remove the cake from the freezer and let it stand at room temperature for about 10 minutes. Spoon the ⅔ of the mascarpone mixture on the top of the cheesecake and even out with a frosting spatula. Since the cheesecake is still very cold, the mascarpone cream will set fast.
Release and gently remove the sides of the springform. Spread the remaining mascarpone cream around the sides of the cake.
Lastly, sprinkle with cocoa powder or chocolate curls to decorate.
Refrigerate at least 2 hours, until the mascarpone layer is cold and cheesecake layer has defrosted.
Slice the cake with a sharp, straight-edge knife cleaning it with a paper towel between each slice. Keep leftover cake covered in a refrigerator for up to one week or freeze for up to one month.
Tips
  • Have all of your ingredients for the cheesecake layer at room temperature. Take them out of the fridge a couple of hours before you plan baking.
  • Don't overmix the ingredients (best to use the paddle attachment).
  • To prevent the cheesecake from cracking and bake it evenly from the outside to the center, bake it in a water bath.
  • Wrap your springform pan with a couple of heavy-duty foil layers before placing it into the hot, 1-inch deep water bath (bain-marie or use a roasting pan). The foil helps minimize any leakage of the water into the cheesecake. Alternatively, you can place your springform pan into a larger cake pan that will form a barrier.
  • If you choose not to use a water bath, once it has done baking, turn the oven off and open the door slightly so that it cools down slowly. The cracks will be covered with the tiramisu layer anyway.
  • Ensure that the cake is properly chilled at each stage of the recipe. This will help it set, and it will mean that the mascarpone topping won't slide off. It will also be easier to remove from the pan.
  • Please keep in mind that nutritional information is a rough estimate and can vary significantly based on the products used and serving size.
All that's Jas
Want more details about this and other recipes? Check out more here!
Go
Comments
Next